【译】在 fly.io 上使用 Rust 进行远程开发

原文: https://fasterthanli.me/articles/remote-development-with-rust-on-fly-io

披露:在撰写本文时,我受益于 fly.io“员工免费套餐”。我不会为“在合理范围内”托管在那里的副项目付费。这里讨论的项目符合这一条件。

为什么您可能需要远程开发环境

撇开这条不幸的推文带来很多克苏鲁之外的恐慌不谈,我们有很多理由想要一个远程开发环境。

例如,也许您唯一可用的计算机的性能不足以执行您想要执行的任务。如:构建很多很多 Rust 项目。像编译器,或者 rust-analyzer,或者你可能像我一样古怪,你独自维护着 7 个大型专有代码库,所以你的博客 slash 视频平台是你喜欢的方式。

因此,与其购买强劲 CPU(如 Threadripper,或更消费化的产品,如最新的 Ryzens),不如租用一台可以根据需要打开和关闭的大型云计算机。只为搞大事情。

如果你需要一堆 CPU 直接在 Rust 项目本身上工作,顺便说一句,Rust 基金会有一个程序。

另一个很好的理由是你投资了另一个不兼容的品牌 CPU,比如 M1 或 M2(它会在哪里结束?),这是 arm64。但是您需要为 Linux x86_64 部署。

在这种情况下,您可以假装 macOS arm64 和 Linux x86_64 由于 都非常”unix”,而“足够接近”,并为基本上两个target维护您的代码库,为以后留下令人讨厌的惊喜,或者您可以在 VM 中工作。或者 x86_64 Docker 容器,在 macOS 上,它在 VM 中运行。

这很好,但它会让大多数笔记本电脑起飞。我不知道 Apple Silicon 的情况如何(有人给我发一个!)但我假设即使它是一场革命,在它上面模拟 x86 仍然不如实际的 x86 处理器快。我可能错了。我相信我很快就会知道的。

另一个很好的理由是,您可能正在管理一个开发团队,而不仅仅是您。你希望能够 1) 雇用来自世界各地的人,2) 雇用家里还没有一台笨拙电脑的人,3) 不必向他们运送一台笨拙的电脑(然后你必须得到回馈或赠予他们),4) 快速让他们入职,为他们提供一个一致的开发环境,让一切在第一次就可以正常工作。

我,我没有团队。好吧……我这样做:每次我发表文章时,都会有一大群人通过报告拼写错误、不准确等来弥补编辑的缺席。但是所有代码方面都只有我一个人。而且我有几台计算机可以胜任定期编译一公吨 Rust 的任务,就像我倾向于做的那样。他们都没有在桌面上运行 Linux,虽然我专门为 Linux 提供东西(包括我的日常工作和我的副业),但这不是 VM 无法解决的问题,而且我有很多这样的东西。

我的理由要简单得多,而且可能很愚蠢:在我写这篇文章时,外面的温度是 37 摄氏度(99 华氏度)。我的大型台式机不仅不是我可用的最环保的机器,而且还会散发出相当多的热量。这些热量还会累加。

此外,我也喜欢能够从不同的地方写作,所以这意味着要有两台电脑,并使用一台(笔记本电脑)远程连接到另一台(台式机),这使得能源+热量问题变得更糟,而且现在我们会遇到这样的麻烦 “当您通过 SSH 连接到在其上运行的 Linux VM 时,您如何设法使桌面保持清醒状态,但当它不在时使其迅速进入睡眠状态”。

你知道你点击发布的那一刻有人会告诉你这并不难,如果你只是这样做(随后有两页的说明)

是的,我知道。仍然存在散热和电费账单的问题。

所以无论如何,因为 fly.io 在工作日付钱给我让他们的平台变得更好(更准确地说是 fly-proxy,所有 TCP 流量现在都经过的东西,除了 IPv6 专用网络,我最近在他们的网站上写过博客),我有一个员工折扣优惠。

这笔交易是我直接不为那里的计算付费。所以这里有一个重要的旧免责声明:我不需要为此支付任何费用。他们也在付钱给我,但为了其他东西。 这是周末阿莫斯。付钱让我写这篇文章的人是我的赞助人——所以作为fly.io的非付费客户,我会在那里给出我的诚实意见。

我们对免责声明部分满意吗?大家清楚了吗?

所以,你是一个托儿,暂时扮演“不是托儿”的角色,你找到了一种方法把 Rust 偷偷放进去,因为你情不自禁。

我的意思是,当然……但我只是觉得它很整洁?我会解释一堆关于它如何工作的东西,以及为什么它对我特别有效(即使我确实需要为此付费)。

fly.io 到底是干什么用的

这部分可能会被误解为营销,但实际上我只是想让你们清楚我们正在合作的内容。我花了很长时间才真正理解 fly 是什么,即使在阅读了几次文档之后也是如此。在从内部破解它,以及后来的几个副项目(比如我的视频)之后,我想我明白了。

所以基本上 fly 让你做的是将你的代码推送到那里,然后让它在云中运行。

啊,就像 Heroku。

有点像但也没有。Heroku 有整个 buildpacks 的东西,我想 fly 也以某种方式支持它,但我对那部分根本不感兴趣,所以我的理解还不足以回答这个问题。

我个人的看法是,我用任何东西构建了一个 Docker 镜像(目前只有 x86_64),推动它运行(所以他们有自己的镜像注册表),然后它在云中运行。

啊,就像 Google Cloud Run 或任何与 AWS 等效的东西。

同样,有点像但也不是,因为它实际上并不在 Docker 中运行。它在Firecracker microVM中运行。这是一个真正的VM,因此您没有容器通常的限制。

例如?

让我们稍后再谈。

首先让我向您展示如何在那里部署一个东西。我们的东西将是 Rust,因为我的博客我的规则,一如既往。

所以,我能想到的最简单的 HTTP 服务器:

1
2
3
4
5
$ cargo new hello-axum
Created binary (application) `hello-axum` package
$ cd hello-axum
$ cargo add tokio +full
$ cargo add axum
1
2
3
4
5
6
7
8
9
10
11
12
13
14
15
16
17
18
19
// in `hello-axum/src/main.rs`

use axum::{response::IntoResponse, routing::get, Router, Server};

#[tokio::main]
async fn main() {
let app = Router::new().route("/", get(index));

let addr = "[::]:8080".parse().unwrap();
println!("Listening on http://{addr}");
Server::bind(&addr)
.serve(app.into_make_service())
.await
.unwrap();
}

async fn index() -> impl IntoResponse {
"hello from axum\n"
}

它有效吗?

1
2
3
4
5
6
7
8
9
10
11
12
13
$ cargo run
Compiling cfg-if v1.0.0
Compiling pin-project-lite v0.2.9
Compiling bytes v1.1.0
Compiling itoa v1.0.2
Compiling once_cell v1.12.0
Compiling smallvec v1.8.0
Compiling scopeguard v1.1.0
Compiling fnv v1.0.7
(cut)
Finished dev [unoptimized + debuginfo] target(s) in 2.55s
Running `target/debug/hello-axum`
Listening on http://[::]:8080

然后,从另一个shell:

1
2
3
4
5
6
7
$ curl -i 0:8080
HTTP/1.1 200 OK
content-type: text/plain; charset=utf-8
content-length: 23
date: Sat, 18 Jun 2022 15:38:47 GMT

hello from axum

好的,是时候将其构建为 Docker 镜像了:

1
2
3
4
5
6
7
8
9
10
11
12
13
14
15
16
17
18
19
20
21
22
23
24
25
26
27
28
29
30
31
32
33
34
35
36
37
38
# in `hello-axum/Dockerfile`
# syntax = docker/dockerfile:1.4

FROM rust:1.61.0-slim-bullseye AS builder

WORKDIR /app
COPY . .
RUN --mount=type=cache,target=/app/target \
--mount=type=cache,target=/usr/local/cargo/registry \
--mount=type=cache,target=/usr/local/cargo/git \
--mount=type=cache,target=/usr/local/rustup \
set -eux; \
rustup install stable; \
cargo build --release; \
objcopy --compress-debug-sections target/release/hello-axum ./hello-axum

################################################################################
FROM debian:11.3-slim

RUN set -eux; \
export DEBIAN_FRONTEND=noninteractive; \
apt update; \
apt install --yes --no-install-recommends bind9-dnsutils iputils-ping iproute2 curl ca-certificates htop; \
apt clean autoclean; \
apt autoremove --yes; \
rm -rf /var/lib/{apt,dpkg,cache,log}/; \
echo "Installed base utils!"

WORKDIR app

COPY --from=builder /app/hello-axum ./hello-axum
CMD ["./hello-axum"]
````

另外让我们/target从 Docker 上下文中排除,我们在那里不需要它:
```dockerfile
# in `hello-axum/.dockerignore`
/target

还要确保你启用了 docker buildkit,这就是你现在 99% 的时间想要的,它支持所有好的东西。

1
2
3
4
5
6
7
8
9
10
11
12
13
14
$ docker build -t hello-axum .
[+] Building 2.6s (6/13)
=> [internal] load build definition from Dockerfile 0.0s
=> => transferring dockerfile: 990B 0.0s
=> [internal] load .dockerignore 0.0s
=> => transferring context: 79B0.0s
=> [internal] load metadata for docker.io/library/debian:11.3-slim 1.5s
=> [internal] load metadata for docker.io/library/rust:1.61.0-slim-bullseye
(cut)
=> [stage-1 4/4] COPY --from=builder /app/hello-axum ./hello-axum
=> exporting to image
=> => exporting layers
=> => writing image sha256:a6ae1acc11eb094218c1abb4da319a4e53ee93844d98d94c912698d75e2136e0
=> => naming to docker.io/library/hello-axum

上面的 Dockerfile 中有几个巧妙的技巧:工具链、依赖项和文件夹target被缓存,它压缩调试符号(它们不存在,因为我忘了告诉你[profile.release] debug = “1”在其中做Cargo.toml什么),它使用单独的阶段。

无论如何,生成的图像对我来说是 152MB,不是很好,也不是很糟糕,可能可以使用无容器或基于 Alpine 之类的东西,但这会带来其他权衡,这不是 Docker 教程,让我们继续。

重点是,它有效:

1
2
3
4
5
6
$ docker run --detach --rm --name hello-axum --publish 8080:8080 hello-axum
78dde4d1e52dfc199e6ebdeda1b65192ba534cef6d5ea8ba169106e348eb4749
$ curl 0:8080
hello from axum
$ docker kill hello-axum
hello-axum

也就是说,如果您记得使用 Ctrl-C 终止其他进程。否则无法绑定到 8080 端口。

是时候用它部署fly了。我会跳过注册,你需要 安装 flyctl,用你的 fly 帐户登录,等等等等让我们创建一个应用程序:

1
2
3
4
$ fly apps create
? App Name: hello-axum
? Select Organization: Amos Wenger (personal)
New app created: hello-axum

保存我们自动生成的配置:

1
2
3

$ fly config save -a hello-axum
Wrote config file fly.toml

这给了我们这个:

1
2
3
4
5
6
7
8
9
10
11
12
13
14
15
16
17
18
19
20
21
22
23
24
25
26
27
28
29
30
31
32
33
34
35
36
37
38
39
40
# in `hello-axum/fly.toml`

# fly.toml file generated for hello-axum on 2022-06-18T16:02:28Z

app = "hello-axum"
kill_signal = "SIGINT"
kill_timeout = 5
processes = []

[env]

[experimental]
allowed_public_ports = []
auto_rollback = true

[[services]]
http_checks = []
internal_port = 8080
processes = ["app"]
protocol = "tcp"
script_checks = []
[services.concurrency]
hard_limit = 25
soft_limit = 20
type = "connections"

[[services.ports]]
force_https = true
handlers = ["http"]
port = 80

[[services.ports]]
handlers = ["tls", "http"]
port = 443

[[services.tcp_checks]]
grace_period = "1s"
interval = "15s"
restart_limit = 0
timeout = "2s"

这些是默认值,把它们写下来很好。我确实想在端口 80 和 443 上公开内容,这些似乎是玩具应用程序的合理限制,我确实想自动将端口 80 重定向到 443,并且我的内部端口已经是 8080,唯一缺少的是要推送的镜像,因此,添加一个新部分:

1
2
[build]
image = "hello-axum"

我们开始了:

1
2
3
4
5
6
7
8
9
10
11
12
13
14
15
16
17
18
19
20
21
22
23
$ fly deploy
==> Verifying app config
--> Verified app config
==> Building image
Searching for image 'hello-axum' locally...
image found: sha256:3f93ceb9158f5e123253060d58d607f7c2a7e2f93797b49b4edbbbcc8e1b3840
==> Pushing image to fly
The push refers to repository [registry.fly.io/hello-axum]
02f75279051e: Pushed
4e38e245312b: Pushed
85ade8c6ca76: Pushed
ad6562704f37: Pushed
deployment-1655568332: digest: sha256:1ddfda6a6d8d84d804602653501db1c9720677b6e04e31008d3256c53ec09723 size: 1159
--> Pushing image done
==> Creating release
--> release v2 created

--> You can detach the terminal anytime without stopping the deployment
==> Monitoring deployment

1 desired, 1 placed, 1 healthy, 0 unhealthy [health checks: 1 total, 1 passing]
--> v0 deployed successfully

因为镜像在本地可用,所以它只是将其推送到 fly docker镜像仓库(还有一个我从未使用过的远程构建器功能)。

然后它为我们创建了一个应用程序实例……某处?最终分配给了一个worker,并且……感觉像是永恒但几乎肯定不到一分钟,我们的应用程序启动了。

1
2
3
4
5
6
7
8
9
10
$ curl https://hello-axum.fly.dev -i
HTTP/2 200
content-type: text/plain; charset=utf-8
content-length: 16
date: Sat, 18 Jun 2022 16:07:39 GMT
server: Fly/09a15cede3 (2022-06-17)
via: 2 fly.io
fly-request-id: 01G5VS3SPBQ4XY4M7VZXTG8KBJ-cdg

hello from axum

我们可以在这里看到一些新的标题!它还使用 http/2,您可以从server标头中看出我昨天已部署到生产环境。

那里还有很多其他很酷的东西,比如内置指标,但这些并不是真正相关的。还有一个完整的网络用户界面,显示是的,我们确实有一个应用程序在运行,显示一些图表,甚至是实时流式传输的日志等。但是以这种格式谈论 CLI 更容易,所以,日志:

1
2
3
4
5
6
7
8
9
10
11
12
13
$ fly logs
2022-06-18T16:05:53Z runner[fdca430e] cdg [info]Starting instance
2022-06-18T16:05:53Z runner[fdca430e] cdg [info]Configuring virtual machine
2022-06-18T16:05:53Z runner[fdca430e] cdg [info]Pulling container image
2022-06-18T16:05:58Z runner[fdca430e] cdg [info]Unpacking image
2022-06-18T16:05:59Z runner[fdca430e] cdg [info]Preparing kernel init
2022-06-18T16:05:59Z runner[fdca430e] cdg [info]Configuring firecracker
2022-06-18T16:06:00Z runner[fdca430e] cdg [info]Starting virtual machine
2022-06-18T16:06:00Z app[fdca430e] cdg [info][ 0.026893] PCI: Fatal: No config space access function found
2022-06-18T16:06:00Z app[fdca430e] cdg [info]Starting init (commit: e21acb3)...
2022-06-18T16:06:00Z app[fdca430e] cdg [info]Preparing to run: `./hello-axum` as root
2022-06-18T16:06:00Z app[fdca430e] cdg [info]2022/06/18 16:06:00 listening on [fdaa:0:446c:a7b:ae02:fdca:430e:2]:22 (DNS: [fdaa::3]:53)
2022-06-18T16:06:00Z app[fdca430e] cdg [info]Listening on http://[::]:8080

我不知道消息是什么PCI意思,不要问我。init是 fly 的自定义 init 程序,它也是全 Rust,这是它的旧快照,我们可以看到我们的应用程序正在运行。

我们甚至知道它运行的位置(cdg = 巴黎戴高乐机场),离我住的地方最近的区域。

还有许多其他有用的 CLI 命令:

1
2
3
4
5
6
7
8
9
10
11
12
13
14
15
16
17
18
$ fly status
App
Name = hello-axum
Owner = personal
Version = 0
Status = running
Hostname = hello-axum.fly.dev

Deployment Status
ID = 70edc42a-9bac-0b2a-803c-c0cec866929a
Version = v0
Status = successful
Description = Deployment completed successfully
Instances = 1 desired, 1 placed, 1 healthy, 0 unhealthy

Instances
ID PROCESS VERSION REGION DESIRED STATUS HEALTH CHECKS RESTARTS CREATED
fdca430e app 0 cdg run running 1 total, 1 passing 0 6m50s ago
1
2
3
4
5
6
7
8
9
10
11
12
13
14
15
16
17
18
19
20
21
22
23
$ fly vm status fdca430e
Instance
ID = fdca430e
Process =
Version = 0
Region = cdg
Desired = run
Status = running
Health Checks = 1 total, 1 passing
Restarts = 0
Created = 7m10s ago

Recent Events
TIMESTAMP TYPE MESSAGE
2022-06-18T16:05:52Z Received Task received by client
2022-06-18T16:05:52Z Task Setup Building Task Directory
2022-06-18T16:06:00Z Started Task started by client

Checks
ID SERVICE STATE OUTPUT
3df2415693844068640885b45074b954 tcp-8080 passing TCP connect 172.19.2.2:8080: Success

Recent Logs

所以,是的,那是经典的飞翔!

我们fly regions set可以决定我们的应用程序应该在哪里运行,fly scale count我们可以更改正在运行的实例数,fly scale vm我们可以切换 VM 类型(现在非常简单),例如,这是我必须我用来做视频的:

1
2
3
4
5
6
7
8
9
10
11
12
13
14
15
16
17
18
19
20
21
22
23
24
25
$ fly status
App
Name = tube
Owner = personal
Version = 164
Status = running
Hostname = tube.fly.dev

Instances
ID PROCESS VERSION REGION DESIRED STATUS HEALTH CHECKS RESTARTS CREATED
c1f4d89e app 164 sjc run running 0 2022-06-14T22:02:22Z
b74afb02 app 164 yyz run running 0 2022-05-09T21:07:53Z
8b5ca0c7 app 164 gru run running 0 2022-05-09T21:07:15Z
0b08b59c app 164 ams run running 0 2022-05-09T21:06:30Z
6389589a app 164 cdg run running 0 2022-05-09T21:05:42Z
ea94e5ef app 164 nrt run running 0 2022-05-09T21:03:21Z
79ecda2b app 164 iad run running 1 2022-05-09T21:02:51Z
26ea7a65 app 164 yyz run running 0 2022-05-09T21:02:10Z

$ fly scale show
VM Resources for tube
VM Size: shared-cpu-1x
VM Memory: 512 MB
Count: 8
Max Per Region: Not set
试图让他们后悔他们一生的员工折扣,是吗?

嘿,规则是用来测试的。

哦,是的,还有volumes!因为实例被创建和销毁以及一些您不想丢失的数据,所以您将其保存在volumes中:

1
2
3
4
5
6
7
8
9
10
11
12
13
$ fly volumes list
ID STATE NAME SIZE REGION ZONE ATTACHED VM CREATED AT
vol_18l524y8j0er7zmp created tubecache 40GB ams 8aba 0b08b59c 1 month ago
vol_18l524y8j5jr7zmp created tubecache 40GB yyz d33c 26ea7a65 1 month ago
vol_okgj54580lq4y2wz created tubecache 40GB iad ddf7 1 month ago
vol_x915grnzw8krn70q created tubecache 40GB nrt 0e0f ea94e5ef 1 month ago
vol_ke628r68g3n4wmnp created tubecache 40GB sjc c0a5 c1f4d89e 1 month ago
vol_02gk9vwnej1v76wm created tubecache 40GB cdg 0e8c 6389589a 1 month ago
vol_8zmjnv8em85vywgx created tubecache 40GB yyz 5e29 b74afb02 1 month ago
vol_ypkl7vz8k5evqg60 created tubecache 40GB iad f6cb 79ecda2b 1 month ago
vol_0nylzre12814qmkp created tubecache 40GB gru 2824 8b5ca0c7 1 month ago
vol_52en7r1jpl9rk6yx created tubecache 40GB syd 039e 1 month ago
vol_w1q85vgn7jj4zdxe created tubecache 40GB lhr ad0e 1 month ago
你说你不想做营销?远程开发环境在哪里?

我开始了!所以回到我们的hello-axum应用程序,我们可以通过 SSH 进入它:

1
2
3
4
5
$ fly ssh console
Connecting to top1.nearest.of.hello-axum.internal... complete
# whoami
root
#

这就是事情变得有趣的地方,因为这里你会开始注意到fly并没有运行一个docker容器。

让我们开始bash运行更多命令:

1
2
3
root@fdca430e:/# cat /proc/cpuinfo | grep -i mhz
cpu MHz : 2799.998

所以我们有一个共享核心,这是默认设置。

1
2
$ root@fdca430e:/# uname -a
Linux fdca430e 5.12.2 #1 SMP Thu Jun 2 14:26:49 UTC 2022 x86_64 GNU/Linux

Linux 5.12.2,从 .. 2021 年 4 月开始,仍然相对较新。最近足够了,如果我们愿意的话,我们可以玩 io-uring。

不不不不继续工作。

但是,是的,我们的 Docker 镜像不提供内核,只提供用户空间。内核是fly 给我们的任何东西。不过,我们有一个内核。稍后会派上用场。

现在,是时候回顾一下为什么“经典的 fly.io 应用程序”不能真正用作远程开发环境了。

首先,我们不能缩放到零。

1
2
$ fly scale count 0
Count changed to 0
1
2
3
4
5
6
7
8
9
10
11

$ fly status
App
Name = hello-axum
Owner = personal
Version = 1
Status = dead
Hostname = hello-axum.fly.dev

Instances
ID PROCESS VERSION REGION DESIRED STATUS HEALTH CHECKS RESTARTS CREATED

好吧,我想你可以……但是正如你所看到的,应用程序的状态现在是“已死”。突然 fly-proxy不知道应用程序存在了。

所以如果我们尝试curl它:

1
2
3
4
5
6
7
8
9
10
$ curl -v https://hello-axum.fly.dev
* Trying 2a09:8280:1::1:4857:443...
* TCP_NODELAY set
* Connected to hello-axum.fly.dev (2a09:8280:1::1:4857) port 443 (#0)
* ALPN, offering h2
* ALPN, offering http/1.1
* successfully set certificate verify locations:
* CAfile: /etc/ssl/certs/ca-certificates.crt
CApath: /etc/ssl/certs
* TLSv1.3 (OUT), TLS handshake, Client hello (1):

我们会被困在那里,最终:

1
2
3
* OpenSSL SSL_connect: Connection reset by peer in connection to hello-axum.fly.dev:443 
* Closing connection 0
curl: (35) OpenSSL SSL_connect: Connection reset by peer in connection to hello-axum.fly.dev:443

那是因为fly-proxy正在等待另一个实例启动:如果您有一个发布策略,您的应用程序在部署之间暂时具有零个实例,则可能会发生这种情况。(您可能不想这样做,至少有一个实例可以避免停机)。

我们可以用 启动它fly scale,但它… 不快。

1
2
3
4
5
6
7
8
9
10
11
12
13
14
15
16
17
18
19
20
21
$ time bash -c 'fly scale count 1; while true; do curl https://hello-axum.fly.dev --max-time 1 && exit 0 || echo "still starting..."; done'
Count changed to 1
curl: (28) Operation timed out after 1000 milliseconds with 0 out of 0 bytes received
still starting...
curl: (28) Operation timed out after 1001 milliseconds with 0 out of 0 bytes received
still starting...
curl: (28) Operation timed out after 1000 milliseconds with 0 out of 0 bytes received
still starting...
curl: (28) Operation timed out after 1001 milliseconds with 0 out of 0 bytes received
still starting...
curl: (28) Operation timed out after 1001 milliseconds with 0 out of 0 bytes received
still starting...
curl: (28) Operation timed out after 1000 milliseconds with 0 out of 0 bytes received
still starting...
curl: (28) Operation timed out after 1000 milliseconds with 0 out of 0 bytes received
still starting...
curl: (28) Operation timed out after 1001 milliseconds with 0 out of 0 bytes received
still starting...
hello from axum
bash -c 0.14s user 0.07s system 2% cpu 8.421 total

这是一次不幸运的启动,当我看curl返回正确的 bash 咒语前,它花了3秒重新启动。

但是,它做了下面这些必要的事情,

  • 对 fly.io 进行 API 调用

  • 这创造了一个游牧工作

  • 最终被游牧者分配到某个地方

  • 它通知 fly.io 它已启动

  • 还创建了一些领事服务

  • 最终 fly-proxy 知道这些服务

  • 因为服务是它知道一个应用程序甚至现在存在的方式,所以它再次知道该应用程序,并且可以开始在那里路由流量。

    等等等等,你应该分享那么多内部细节吗?

哦,别担心,他们分享过细节

那么,它适合远程开发环境吗?

SSH服务器问题

fly.io 提供了 SSH 服务器,但还不够好。让我们看看为什么。

首先,fly ssh console为您处理所有肮脏的细节。

如果我们想使用vanilla ssh我们必须做更多的事情。我们可以使用 fly proxy将本地端口映射到远程实例的 SSH 服务器端口。

1
2
3
$ fly proxy 2200:22 hello-axum.internal
Proxying local port 2200 to remote [hello-axum.internal]:22

(这里我们只有一个实例。如果我们有多个我需要使用d76c732a.vm.hello-axum.internal)

然后发出 SSH 密钥对:

1
2
3
4
5
6
7
8
9
10
11
12

$ fly ssh issue
? Select organization: Amos Wenger (personal)
? Email address for user to issue cert: [redacted]

!!!! WARNING: We're now prompting you to save an SSH private key and certificate !!!!
!!!! (the private key in "id_whatever" and the certificate in "id_whatever-cert.pub"). !!!!
!!!! These SSH credentials are time-limited and handling them in files is clunky; !!!!
!!!! consider running an SSH agent and running this command with --agent. Things !!!!
!!!! should just sort of work like magic if you do. !!!!
? Path to store private key: /tmp/id_rsa
Wrote 24-hour SSH credential to /tmp/id_rsa, /tmp/id_rsa-cert.pub

然后我们可以连接:

1
2
3
$ ssh -i /tmp/id_rsa localhost -p 2200 whoami
(cut: fingerprint stuff)
root

但是我们不能,例如,在它上面代理一些端口:

1
2
$ ssh -i /tmp/id_rsa localhost -p 2200 -L 8080:localhost:8080
#
1
2
$ curl localhost:8080
curl: (56) Recv failure: Connection reset by peer

我不知道为什么!ssh -vvv那里不是很有帮助。但是当我尝试从 VSCode 连接时,通过将其推入我的~/.ssh/config:

1
2
3
4
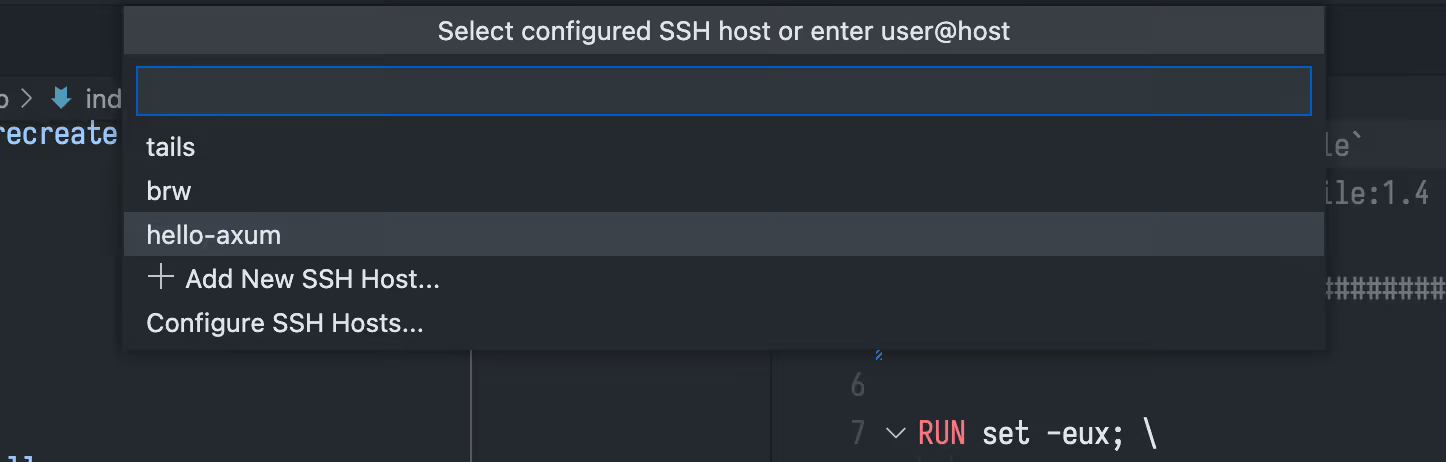
Host hello-axum
HostName localhost
Port 2200
IdentityFile /tmp/id_rsa
1
2
3
4
5
6
7
8
9
10
11
12
13
14
15
[19:27:01.785] Remote server is listening on 43703
[19:27:01.785] Parsed server configuration: {"serverConfiguration":{"remoteListeningOn":{"port":43703},"osReleaseId":"debian","arch":"x86_64","webUiAccessToken":"","sshAuthSock":"","display":"","tmpDir":"/tmp","platform":"linux","connectionToken":"1a11a111-1111-111a-aaa1-a11a11111111"},"downloadTime":3407,"installTime":1447,"serverStartTime":99,"installUnpackCode":"success"}
[19:27:01.786] Persisting server connection details to /Users/amos/Library/Application Support/Code/User/globalStorage/ms-vscode-remote.remote-ssh/vscode-ssh-host-9a297f3d-30d9c6cd9483b2cc586687151bcbcd635f373630-0.82.1/data.json
[19:27:01.788] Starting forwarding server. localPort 54022 -> socksPort 54016 -> remotePort 43703
[19:27:01.788] Forwarding server listening on 54022
[19:27:01.788] Waiting for ssh tunnel to be ready
[19:27:01.789] Tunneled 43703 to local port 54022
[19:27:01.789] Resolved "ssh-remote+hello-axum" to "127.0.0.1:54022"
[19:27:01.790] [Forwarding server 54022] Got connection 0
[19:27:01.796] ------
[19:27:01.807] [Forwarding server 54022] Got connection 1
[19:27:01.809] Failed to set up socket for dynamic port forward to remote port 43703: connect ECONNREFUSED 127.0.0.1:54016. Is the remote port correct?
[19:27:01.809] > local-server-1> ssh child died, shutting down
[19:27:01.809] Failed to set up socket for dynamic port forward to remote port 43703: Socket closed. Is the remote port correct?
[19:27:01.812] Local server exit: 0

所以,我们需要一个更好的 SSH 服务器。而且,就个人而言,我不想每次想要连接到我的远程开发环境时都必须运行(flyctl 命令,而不是在 fly 应用程序前面运行的 TCP/HTTP 代理)。

哦,SSH 密钥会在 24 小时后过期。而且您无法配置 SSH 服务器,因为它是内置的(除非我遗漏了什么)。

因此,将其与缓慢的启动/停止时间结合起来,事情看起来不太好。(特别是因为我们不清楚如何启动/停止单个实例。玩弄并fly regions实现fly scale它听起来很危险!)

输入 fly.io 机器

描述 fly.io 机器的最佳方式就是“firecracker microVMs as a service”,中间没有 Nomad/Consul。

为此,我们需要一个新的 fly.io 应用程序——您现在不能只将机器添加到常规应用程序(或永远?我不是这里的 PM)。

1
2
3
4
$ fly apps create
? App Name: axum-machine
? Select Organization: Amos Wenger (personal)
New app created: axum-machine

因为我不喜欢每次都 指定-a/-app ,所以我将编辑并更改该行以读取“axum-machine”而不是“hello-axum”。文件的其余部分对machine无关紧要。–appfly.tomlapp =

然后我们可以运行相同的 Docker 镜像,但作为一个fly machine:

1
2
3
4
5
6
7
8
9
10
11
12
13
14
15
16
17
18
19
20
21
22
23
24

$ fly machines run --port 80:8080/tcp:http --port 443:8080/tcp:http:tls --region cdg --size shared-cpu-1x hello-axum
Searching for image 'hello-axum' locally...
image found: sha256:3f93ceb9158f5e123253060d58d607f7c2a7e2f93797b49b4edbbbcc8e1b3840
==> Pushing image to fly
The push refers to repository [registry.fly.io/axum-machine]
02f75279051e: Layer already exists
4e38e245312b: Layer already exists
85ade8c6ca76: Layer already exists
ad6562704f37: Layer already exists
deployment-1655573668: digest: sha256:1ddfda6a6d8d84d804602653501db1c9720677b6e04e31008d3256c53ec09723 size: 1159
--> Pushing image done
Image: registry.fly.io/axum-machine:deployment-1655573668
Image size: 152 MB
Machine is launching...
Success! A machine has been successfully launched, waiting for it to be started
Machine ID: 217814d9c9ee89
Instance ID: 01G5VY2TKH0A1MQWSX05S1GPK8
State: starting
Waiting on firecracker VM...
Machine started, you can connect via the following private ip
fdaa:0:446c:a7b:5b66:d530:1a4b:2

请注意,推送图像是即时的,因为它已经存在于 fly 的镜像仓库。

你可以看到那里没有提到分配或任何东西:它只是根据要求启动一个虚拟机,并给我们它的私有 IPv6 地址。

这只有在我们建立私人网络时才有效,我现在懒得去做。

相反,让我们检查一下我们是否仍然可以使用默认的 SSH 服务器通过 SSH 连接到它:

1
2
3
4
$ fly ssh console
Connecting to top1.nearest.of.axum-machine.internal... complete
# whoami
root

到目前为止,一切都很好。

1
2
3
4
5
6
7
8
9
10
11
$ fly status
App
Name = axum-machine
Owner = personal
Version = 0
Status = pending
Hostname = axum-machine.fly.dev

Machines
ID NAME REGION STATE CREATED
217814d9c9ee89 ancient-snowflake-1933 cdg started 2022-06-18T17:34:30Z

这也有效,并显示我们的机器正在运行。棒!

我们还有:

1
2
3
4
5
6
7
$ fly m list
1 machines have been retrieved.
View them in the UI here (​https://fly.io/apps/axum-machine/machines/)

axum-machine
ID IMAGE CREATED STATE REGION NAME IP ADDRESS
217814d9c9ee89 axum-machine:deployment-1655573668 2022-06-18T17:34:30Z started cdg ancient-snowflake-1933 fdaa:0:446c:a7b:5b66:d530:1a4b:2

..其中有更多细节。

我们的应用程序目前没有公共 IP,因此无法使用 curl 访问域。

但我们可以分配一个 - 我会选择 IPv6,因为我有它,而 IPv4 地址是一种宝贵的商品。

1
2
3
4
$ fly ips allocate-v6
TYPE ADDRESS REGION CREATED AT
v6 2a09:8280:1::48d5 global 1s ago

现在这行得通了!

1
2
3
4
5
6
7
8
9
10
$ curl -i https://axum-machine.fly.dev
HTTP/2 200
content-type: text/plain; charset=utf-8
content-length: 16
date: Sat, 18 Jun 2022 17:39:27 GMT
server: Fly/09a15cede3 (2022-06-17)
via: 2 fly.io
fly-request-id: 01G5VYBX04VT7JDNQF626KGZ52-cdg

hello from axum

最妙的是:我们可以停止machine。

1
2
3
4
5
6
7
8
9
10
11
12
13
14
15

$ fly m stop 217814d9c9ee89
217814d9c9ee89 has been successfully stopped
$ fly m status 217814d9c9ee89
Success! A machine has been retrieved
Machine ID: 217814d9c9ee89
Instance ID: 01G5VY2TKH0A1MQWSX05S1GPK8
State: stopped

Event Logs
MACHINE STATUS EVENT TYPE SOURCE TIMESTAMP
stopped exit flyd 2022-06-18T17:40:38.517Z
stopping stop user 2022-06-18T17:40:35.245Z
started start flyd 2022-06-18T17:34:41.353Z
created launch user 2022-06-18T17:34:30.538Z

我们可以在事件日志中看到它确实停止了。

现在,如果我们尝试再次运行我们的curl……

1
2
3
4
5
6
7
8
9
10
$ curl -i https://axum-machine.fly.dev
HTTP/2 200
content-type: text/plain; charset=utf-8
content-length: 16
date: Sat, 18 Jun 2022 17:41:46 GMT
server: Fly/09a15cede3 (2022-06-17)
via: 2 fly.io
fly-request-id: 01G5VYG3JYZFJ0871A26DCYGKT-cdg

hello from axum

它……还能用吗?

惊喜!震惊!敬畏!可预见的情节转折!
1
2
3
4
5
6
7
8
9
10
11
12
13
14
$ fly m status 217814d9c9ee89
Success! A machine has been retrieved
Machine ID: 217814d9c9ee89
Instance ID: 01G5VY2TKH0A1MQWSX05S1GPK8
State: started

Event Logs
MACHINE STATUS EVENT TYPE SOURCE TIMESTAMP
started start flyd 2022-06-18T17:41:46.075Z
starting start user 2022-06-18T17:41:45.695Z
stopped exit flyd 2022-06-18T17:40:38.517Z
stopping stop user 2022-06-18T17:40:35.245Z
started start flyd 2022-06-18T17:34:41.353Z
created launch user 2022-06-18T17:34:30.538Z

呵呵,又开始了。

阿莫斯没有假装惊讶。你在那个功能上工作。你很清楚它的作用。

好的好的,好的。因此,如果您为具有机器的应用程序访问公共端口,它会尝试启动一台机器来处理连接(原始 TCP)/请求(HTTP)。

我们绝对可以利用它来发挥我们的优势。

你在想什么?暴露22端口?

嗯,是!让我们试试吧。

1
2
3
4
5
6
7
8
9
10
11
12
13
14
15
16
17
18
19
20
21
22
23
24
25
26
$ fly m remove --force 217814d9c9ee89
machine 217814d9c9ee89 was found and is currently in started state, attempting to destroy...
217814d9c9ee89 has been destroyed

$ fly machines run --app axum-machine --port 22:22/tcp --region cdg --size shared-cpu-1x hello-axum
Searching for image 'hello-axum' locally...
image found: sha256:3f93ceb9158f5e123253060d58d607f7c2a7e2f93797b49b4edbbbcc8e1b3840
==> Pushing image to fly
The push refers to repository [registry.fly.io/axum-machine]
02f75279051e: Layer already exists
4e38e245312b: Layer already exists
85ade8c6ca76: Layer already exists
ad6562704f37: Layer already exists
deployment-1655574325: digest: sha256:1ddfda6a6d8d84d804602653501db1c9720677b6e04e31008d3256c53ec09723 size: 1159
--> Pushing image done
Image: registry.fly.io/axum-machine:deployment-1655574325
Image size: 152 MB
Machine is launching...
Success! A machine has been successfully launched, waiting for it to be started
Machine ID: 5918536ef46383
Instance ID: 01G5VYPX14END6ZPAHBB411304
State: starting
Waiting on firecracker VM...
Machine started, you can connect via the following private ip
fdaa:0:446c:a7b:5adc:24:e81f:2

进而:

1
2
3
4
5
6
7
8
9
10
11
12
$ ssh -vvv -i /tmp/id_rsa [email protected]
OpenSSH_8.2p1 Ubuntu-4ubuntu0.5, OpenSSL 1.1.1f 31 Mar 2020
debug1: Reading configuration data /etc/ssh/ssh_config
debug1: /etc/ssh/ssh_config line 19: include /etc/ssh/ssh_config.d/*.conf matched no files
debug1: /etc/ssh/ssh_config line 21: Applying options for *
debug2: resolving "axum-machine.fly.dev" port 22
debug2: ssh_connect_direct
debug1: Connecting to axum-machine.fly.dev [2a09:8280:1::48d5] port 22.
debug1: Connection established.
debug1: identity file /tmp/id_rsa type -1
debug1: identity file /tmp/id_rsa-cert type 7
debug1: Local version string SSH-2.0-OpenSSH_8.2p1 Ubuntu-4ubuntu0.5

嗯,卡住了。

让我们检查应用程序日志…

1
2
3
4
5
6
7
8
$ 2022-06-18T17:47:43Z proxy[5918536ef46383] cdg [info]Machine not ready yet (11.072820024s since start requested)
2022-06-18T17:47:44Z proxy[5918536ef46383] cdg [info]Machine not ready yet (15.250221892s since start requested)
2022-06-18T17:47:45Z proxy[5918536ef46383] cdg [info]Machine not ready yet (33.956303928s since start requested)
2022-06-18T17:47:47Z proxy[5918536ef46383] cdg [info]Machine not ready yet (5.409191838s since start requested)
2022-06-18T17:47:48Z proxy[5918536ef46383] cdg [info]Machine not ready yet (10.043353267s since start requested)
2022-06-18T17:47:48Z proxy[5918536ef46383] cdg [info]Machine not ready yet (16.080325672s since start requested)
2022-06-18T17:47:50Z proxy[5918536ef46383] cdg [info]Machine not ready yet (38.962990983s since start requested)
^C%

我的天。22 端口上没有监听吗?

让我们检查…

1
2
3
4
5
6
7
8
9
10
11
$ fly ssh console
Connecting to top1.nearest.of.axum-machine.internal... complete
# ss -lpn
Netid State Recv-Q Send-Q Local Address:Port Peer Address:Port Process
nl UNCONN 0 0 0:0 *
(cut)
nl UNCONN 0 0 18:0 *
tcp LISTEN 0 0 *:8080 *:* users:(("hello-axum",pid=508,fd=9))
tcp LISTEN 0 0 [fdaa:0:446c:a7b:5adc:24:e81f:2]:22 *:* users:(("hallpass",pid=509,fd=6))
v_str LISTEN 0 0 3:10000 *:* users:(("init",pid=1,fd=9))

啊! 端口 22 上有一个监听器,称为“hallpass”。但它正在监听……私有 IPv6 地址。不是特殊0.0.0.0/:: 地址。

所以那是行不通的。

没问题,我们将运行我们自己的 SSH 服务器!

让我们也添加一个非 root 用户,除了……我已经习惯了!我通常有一个非 root 用户,使用无密码 sudo,SSH 的仅密钥身份验证。这并不是真正为了安全,更多的是为了避免在没有sudo的情况下对系统文件造成破坏。

我还切换到 Ubuntu 20.04 base,我觉得使用起来比 Debian 更舒服:

1
2
3
4
5
6
7
8
9
10
11
12
13
14
15
16
17
18
19
20
21
22
23
24
25
26
27
28
29
30
31
32
33
34
35
36
37
38
39
40
41
42
43
44
45
# in `hello-axum/Dockerfile`
# syntax = docker/dockerfile:1.4

################################################################################
FROM ubuntu:20.04

RUN set -eux; \
export DEBIAN_FRONTEND=noninteractive; \
apt update; \
apt install --yes --no-install-recommends \
bind9-dnsutils iputils-ping iproute2 curl ca-certificates htop \
curl wget ca-certificates git-core \
openssh-server openssh-client \
sudo less zsh \
; \
apt clean autoclean; \
apt autoremove --yes; \
rm -rf /var/lib/{apt,dpkg,cache,log}/; \
echo "Installed base utils!"

RUN set -eux; \
useradd -ms /usr/bin/zsh amos; \
usermod -aG sudo amos; \
echo '%sudo ALL=(ALL) NOPASSWD:ALL' >> /etc/sudoers; \
echo "added user"

RUN set -eux; \

echo "Port 22" >> /etc/ssh/sshd_config; \
echo "AddressFamily inet" >> /etc/ssh/sshd_config; \
echo "ListenAddress 0.0.0.0" >> /etc/ssh/sshd_config; \
echo "PasswordAuthentication no" >> /etc/ssh/sshd_config; \
echo "ClientAliveInterval 30" >> /etc/ssh/sshd_config; \
echo "ClientAliveCountMax 10" >> /etc/ssh/sshd_config; \
echo "SSH server set up"

USER amos

RUN set -eux; \
mkdir ~/.ssh; \
curl https://github.com/fasterthanlime.keys | tee -a ~/.ssh/authorized_keys

WORKDIR app

CMD ["bash", "-c", "sudo service ssh start; echo 'SSH server started'; sleep infinity"]

(请注意,我们也不再构建任何 Rust。此外, 那里的配置ClientAliveInterval有助于减少 fly 的默认 TCP 空闲超时。它ClientAliveInterval确保只要你连接,即使您的 SSH 会话并不活跃。)

让我们再次构建它:

1
$ docker build -t hello-axum .

并创建一台新机器,确保这次我们公开端口 22。

注意:有一种方法可以通过传递–id ID给 来fly m run替换机器,但是在撰写本文时,它存在状态更新问题,因此在这些问题得到解决之前,我们将继续删除/重新创建机器。除了不重复使用 ID 之外,它没有任何区别。

1
2
3
4
5
$ fly m remove --force 5918536ef46383
(cut)

$ fly m run -p 22:22/tcp -r cdg -s shared-cpu-8x hello-axum
(cut)

还有……瞧!

1
2
3
4

$ ssh axum-machine.fly.dev whoami
amos

现在我们实际上可以使用 VS Code 登录机器,而且它不会报错!

我们所要做的就是将它添加到我们的本地~/.ssh/config

1
2
3
Host hello-axum
HostName axum-machine.fly.dev

然后我们选择要连接的机器:

1

我们可以编辑远程文件,打开任意终端,就像我们通常在 VS Code 中所做的那样工作,除了……远程。

2

与如果我们在 ssh 上使用 vim 之类的东西相比,延迟不是一个问题,因为它不需要等待发送单个击键然后等待终端回显。它比那更复杂一点。

不过,很有可能有一个 fly.io 区域,那里的延迟对您来说还算不错 。对我来说是~10ms:

1
2
3
4
5
6
7
8
9
$ ping6 axum-machine.fly.dev
PING6(56=40+8+8 bytes) [redacted] --> 2a09:8280:1::48d5
16 bytes from 2a09:8280:1::48d5, icmp_seq=0 hlim=52 time=15.792 ms
16 bytes from 2a09:8280:1::48d5, icmp_seq=1 hlim=52 time=13.238 ms
16 bytes from 2a09:8280:1::48d5, icmp_seq=2 hlim=52 time=8.906 ms
^C
--- axum-machine.fly.dev ping6 statistics ---
3 packets transmitted, 3 packets received, 0.0% packet loss
round-trip min/avg/max/std-dev = 8.906/12.645/15.792/2.842 ms

VS Code 也知道如何自动转发端口(如果检测失败则手动转发),所以如果我们在那边启动一个小服务器:

1
2
3
4
5
$ sudo apt update && sudo apt install -y python
(cut)

$ cd /etc
$ python -m SimpleHTTPServer

3

然后 VS Code 自动将端口转发到本地主机:

4
我们可以从本地桌面浏览器打开它:

6

还有一些我喜欢的 VS Code 扩展,比如Resource Monitor,这对我来说是一个非常理想的设置。

哎呀,你甚至可能想出一种方法将远程机器上的某个文件夹挂载到你的本地机器上,通过类似 sshfs 的东西,但是这个项目显然不再维护?所以maintained 也许是一个维护的替代方案。

哦,你想要Volume。您可以使用fly volumes(或fly vol简称)创建它们并通过传递–volume vol_name:/path/on/disk.

该 CLI 选项目前在 flyctl 文档中是隐藏的。这将是我们的小秘密!

注意事项是:它仍然是实验性的,而且您只能使用一个volume(与“经典”fly 应用程序相反)。

在那种环境中的一件好事是您可以轻松地运行 Docker!将它添加到我们的示例 Dockerfile 中有点麻烦,但我是从我的远程环境中输入的,我可以保证它确实会运行 docker:

1
2
3
4
5
6
7
8
9
10
11
12
13
14
15
16
17
18
19
20
21
22
23
$ docker info
(cut)
app: Docker App (Docker Inc., v0.9.1-beta3)
buildx: Docker Buildx (Docker Inc., v0.8.2-docker)
compose: Docker Compose (Docker Inc., v2.6.0)
(cut)
Server:
Server Version: 20.10.17
Storage Driver: overlay2
(cut)
containerd version: 10c12954828e7c7c9b6e0ea9b0c02b01407d3ae1
runc version: v1.1.2-0-ga916309
init version: de40ad0
Security Options:
seccomp
Profile: default
Kernel Version: 5.12.2
Operating System: Ubuntu 20.04.4 LTS
OSType: linux
Architecture: x86_64
CPUs: 8
Total Memory: 15.63GiB
(cut)

还有,还有!同样,因为这是一个真正的虚拟机,而不仅仅是一个 docker 容器,我们可以安装类似的东西perf!

我们必须从源代码构建它,但这没问题:

1
2
3
4
5
6
7
8
KERNEL_VERSION=$(uname -r | sed -r 's/(^[^-]+).*/\1/' | sed -r 's/\.0//g')
echo "Installing perf for kernel ${KERNEL_VERSION}"

mkdir ~/kernel-sources
cd ~/kernel-sources
curl --fail --location "https://mirrors.edge.kernel.org/pub/linux/kernel/v5.x/linux-${KERNEL_VERSION}.tar.xz" | tar -xJ --strip-components=1
sudo apt install --yes libiberty-dev binutils-dev flex bison libelf-dev libunwind-dev liblzma-dev libzstd-dev libdw-dev
sudo make -C tools/ perf_install prefix=/usr/

然后我们可以看到 CPU 时间花在哪里了perf top!

7

有关详细信息,请参阅Brendan Gregg 的性能页面。

我们的小设置只有一个问题,它与价格有关。

machine只有在你调用fly m stop --id MACHINE_ID 才会停止。

我希望它在“暂时不使用”时停止。

我们可以解决这个问题……用 Rust。

又来了

带有 tokio 的简单 TCP 代理

这就是我在“生产”中使用的,可以这么说。这绝对不是唯一的方法,事实上我们会看看是否有时间用其他一些有趣的方法来做,但它简单直接,我喜欢它。

我们不需要为此使用 axum,因为我们只想说 TCP,而不是 HTTP。

1
2
3
4
5
6
7
8
9
10
11
12
13
14
15
16
17
18
19
20
21
22
23
24
25
26
27
28
29
30
31
32
33
34
35
36
37
38
39
40
41
42
43
44
45
46
47
48
49
50
51
52
53
54
55
56
57
58
59
60
61
62
63
64
65
66
67
68
69
70
71
72
73
74
75
76
77
78
// in `hello-axum/src/main.rs`

use std::{
process::Stdio,
sync::{
atomic::{AtomicU64, Ordering},
Arc,
},
time::{Duration, Instant},
};

use tokio::{
net::{TcpListener, TcpStream},
process::Command,
time::sleep,
};

#[tokio::main]
async fn main() {
let status = Command::new("service")
.arg("ssh")
.arg("start")
.stdin(Stdio::null())
.stdout(Stdio::inherit())
.stderr(Stdio::inherit())
.status()
.await
.unwrap();
assert!(status.success());

let num_conns: Arc<AtomicU64> = Default::default();

tokio::spawn({
let num_conns = num_conns.clone();
let mut last_activity = Instant::now();

async move {
loop {
if num_conns.load(Ordering::SeqCst) > 0 {
last_activity = Instant::now();
} else {
let idle_time = last_activity.elapsed();
println!("Idle for {idle_time:?}");
if idle_time > Duration::from_secs(60) {
println!("Stopping machine. Goodbye!");
std::process::exit(0)
}
}
sleep(Duration::from_secs(5)).await;
}
}
});

let listener = TcpListener::bind("[::]:2222").await.unwrap();
while let Ok((mut ingress, _)) = listener.accept().await {
let num_conns = num_conns.clone();
tokio::spawn(async move {
// We'll tell OpenSSH to listen on this IPv4 address.
let mut egress = TcpStream::connect("127.0.0.2:22").await.unwrap();
// did you know: loopback is 127.0.0.1/8, it goes all the way to
// 127.255.255.254 (and 127.255.255.255 for broadcast)

num_conns.fetch_add(1, Ordering::SeqCst);

match tokio::io::copy_bidirectional(&mut ingress, &mut egress).await {
Ok((to_egress, to_ingress)) => {
println!(
"Connection ended gracefully ({to_egress} bytes from client, {to_ingress} bytes from server)"
);
}
Err(err) => {
println!("Error while proxying: {}", err);
}
}
num_conns.fetch_sub(1, Ordering::SeqCst);
});
}
}

等等…停止机器只是std::process::exit?

是的!如果我们的 docker 镜像的“CMD”退出,机器就会停止。在这种情况下,从内部判断机器是否需要停止就容易多了。

(如果我们只能从外部判断,我们会使用机器 API来阻止它。)

不管怎样,这是我们调整后的 Dockerfile:

1
2
3
4
5
6
7
8
9
10
11
12
13
14
15
16
17
18
19
20
21
22
23
24
25
26
27
28
29
30
31
32
33
34
35
36
37
38
39
40
41
42
43
44
45
46
47
48
49
50
51
52
53
54
55
56
57
58
59
60
61
62
63
64
65
66
67
68
69
70
71
72
73
74
75
76
77
78
79
80
81
82
83
84
85
86
87
88
89
90
91
92
93
94
95
96
97
98
99
100
101
# in `hello-axum/Dockerfile`
# syntax = docker/dockerfile:1.4

################################################################################
# Let's just make our own Rust builder image based on ubuntu:20.04 to avoid
# any libc version problems
FROM ubuntu:20.04 AS builder

# Install base utils: curl to grab rustup, gcc + build-essential for linking.
# we could probably reduce that a bit but /shrug
RUN set -eux; \
export DEBIAN_FRONTEND=noninteractive; \
apt update; \
apt install --yes --no-install-recommends \
curl ca-certificates \
gcc build-essential \
; \
apt clean autoclean; \
apt autoremove --yes; \
rm -rf /var/lib/{apt,dpkg,cache,log}/; \
echo "Installed base utils!"

# Install rustup
RUN set -eux; \
curl --location --fail \
"https://static.rust-lang.org/rustup/dist/x86_64-unknown-linux-gnu/rustup-init" \
--output rustup-init; \
chmod +x rustup-init; \
./rustup-init -y --no-modify-path; \
rm rustup-init;

# Add rustup to path, check that it works
ENV PATH=${PATH}:/root/.cargo/bin
RUN set -eux; \
rustup --version;

# Build some code!
# Careful: now we need to cache `/root/.cargo/` rather than `/usr/local/cargo`
# since rustup installed things differently than in the rust build image
WORKDIR /app
COPY . .
RUN --mount=type=cache,target=/app/target \
--mount=type=cache,target=/root/.cargo/registry \
--mount=type=cache,target=/root/.cargo/git \
--mount=type=cache,target=/root/.rustup \
set -eux; \
rustup install stable; \
cargo build --release; \
objcopy --compress-debug-sections target/release/hello-axum ./hello-axum

################################################################################
FROM ubuntu:20.04

RUN set -eux; \
export DEBIAN_FRONTEND=noninteractive; \
apt update; \
apt install --yes --no-install-recommends \
bind9-dnsutils iputils-ping iproute2 curl ca-certificates htop \
curl wget ca-certificates git-core \
openssh-server openssh-client \
sudo less zsh \
; \
apt clean autoclean; \
apt autoremove --yes; \
rm -rf /var/lib/{apt,dpkg,cache,log}/; \
echo "Installed base utils!"

RUN set -eux; \
useradd -ms /usr/bin/zsh amos; \
usermod -aG sudo amos; \
echo '%sudo ALL=(ALL) NOPASSWD:ALL' >> /etc/sudoers; \
echo "added user"

# Note that we've changed the `ListenAddress` here from `0.0.0.0` to
# `127.0.0.2`. It's not really necessary but it's neat that 127.0.0.1 is a /8.
RUN set -eux; \
echo "Port 22" >> /etc/ssh/sshd_config; \
echo "AddressFamily inet" >> /etc/ssh/sshd_config; \
echo "ListenAddress 127.0.0.2" >> /etc/ssh/sshd_config; \
echo "PasswordAuthentication no" >> /etc/ssh/sshd_config; \
echo "ClientAliveInterval 30" >> /etc/ssh/sshd_config; \
echo "ClientAliveCountMax 10" >> /etc/ssh/sshd_config; \
echo "SSH server set up"

USER amos

# Don't forget to change that if you don't want to give /me/ access to your
# remote dev env! Otherwise I'll ssh in there and fix your code 😈
RUN set -eux; \
mkdir ~/.ssh; \
curl https://github.com/fasterthanlime.keys | tee -a ~/.ssh/authorized_keys

WORKDIR app

COPY --from=builder /app/hello-axum ./hello-axum

# Because our top-level process starts the ssh daemon itself, for simplicity,
# let's run it as root. It could drop privileges after that but we already have
# passwordless sudo set up on the machine so double-shrug.
USER root
CMD ["./hello-axum"]

快速之后docker build -t hello-axum . ,让我们再次启动它,将边缘端口 22 映射到机器端口 2222:

1
2
$ fly m run -p 22:2222/tcp -r cdg -s shared-cpu-8x hello-axum
(cut)

这基本上就是全部!你现在可以停止阅读这篇文章了!

现在?但是……你的品牌。

哦,我会继续的。但是你现在可以停止阅读这篇文章了。它缺少一个volume(如上所述),这意味着现在每次停止时,我们所有的数据都会消失。所以我们绝对想要那个。

因为我们只能有一个卷,所以我让我的“伪初始化”进程创建一个符号链接从/var/lib/docker到/home/amos/docker,并更改一些权限,还启动 docker 守护进程,诸如此类。

哦,我还在我的机器上设置了PROXY 协议处理程序,我用ppp crate解析它所以我能够记录尝试连接到我的远程开发环境的真实客户端 IP,即使这些都是 TCP 连接.

嗯?相对于什么?

好吧,如果它们是 HTTP 连接,我们将获得真正的 IP 作为标fly-client-ip 头。但是对于 TCP,实际上并没有“标头”/“自定义元数据”的概念,因此没有 PROXY 协议。

哦,我并没有真正展示它:这是我退出一分钟后日志的样子:

1
2
3
4
5
6
7
8
9
10
11
12
13
14
15
2022-06-19T19:24:18Z proxy[e148e394a72e89] cdg [info]Machine became reachable in 12.924218ms
2022-06-19T19:25:21Z app[e148e394a72e89] cdg [info]Connection ended gracefully (259121 bytes from client, 343897 bytes from server)
2022-06-19T19:25:22Z app[e148e394a72e89] cdg [info]Idle for 5.001673407s
2022-06-19T19:25:27Z app[e148e394a72e89] cdg [info]Idle for 10.002938289s
2022-06-19T19:25:32Z app[e148e394a72e89] cdg [info]Idle for 15.004794068s
2022-06-19T19:25:37Z app[e148e394a72e89] cdg [info]Idle for 20.005997194s
2022-06-19T19:25:42Z app[e148e394a72e89] cdg [info]Idle for 25.00744559s
2022-06-19T19:25:47Z app[e148e394a72e89] cdg [info]Idle for 30.008603681s
2022-06-19T19:25:52Z app[e148e394a72e89] cdg [info]Idle for 35.009784886s
2022-06-19T19:25:57Z app[e148e394a72e89] cdg [info]Idle for 40.010062697s
2022-06-19T19:26:02Z app[e148e394a72e89] cdg [info]Idle for 45.011428658s
2022-06-19T19:26:07Z app[e148e394a72e89] cdg [info]Idle for 50.012635341s
2022-06-19T19:26:12Z app[e148e394a72e89] cdg [info]Idle for 55.013845891s
2022-06-19T19:26:17Z app[e148e394a72e89] cdg [info]Idle for 60.014006722s
2022-06-19T19:26:17Z app[e148e394a72e89] cdg [info]Stopping machine. Goodbye!
好酷!好像我们的工作在这里完成了?然而你想继续,不知何故?

嗯,是的,因为看,如果我从业余微基准测试中学到了一件事,那就是在编程语言之间进行废话比较……

盐。上帝啊,只要签署阿莫斯。

…是系统调用不好。或者慢。任何。现在我们做了一堆系统调用:

1
2
3
4
5
6
7
8
9
10
11
12
13
14
15
16
17
18
19
20
21
22
23
24
25
26
27
28
29
30
31
$ e148e394a72e89% sudo strace -ff -p $(pidof hello-axum) 2>&1 | head -30
strace: Process 586 attached with 9 threads
[pid 599] futex(0x7f8ece5a9608, FUTEX_WAIT_PRIVATE, 1, NULL <unfinished ...>
[pid 598] epoll_wait(3, <unfinished ...>
[pid 597] futex(0x7f8ece9b7608, FUTEX_WAIT_PRIVATE, 1, NULL <unfinished ...>
[pid 596] futex(0x7f8ecebbb608, FUTEX_WAIT_PRIVATE, 1, NULL <unfinished ...>
[pid 595] futex(0x7f8ecedbc608, FUTEX_WAIT_PRIVATE, 1, NULL <unfinished ...>
[pid 594] futex(0x7f8ecefbd608, FUTEX_WAIT_PRIVATE, 1, NULL <unfinished ...>
[pid 593] futex(0x7f8ecf1be608, FUTEX_WAIT_PRIVATE, 1, NULL <unfinished ...>
[pid 592] futex(0x7f8ecf3bf608, FUTEX_WAIT_PRIVATE, 1, NULL <unfinished ...>
[pid 586] futex(0x7f8ecf3c1448, FUTEX_WAIT_PRIVATE, 1, NULL <unfinished ...>
[pid 598] <... epoll_wait resumed>[{EPOLLIN|EPOLLOUT, {u32=16777219, u64=16777219}}], 1024, 336) = 1
[pid 598] recvfrom(12, "\30\317\332\271\354+\345:\3231\223\330\303\333x\177\347%\332[\316\241\235\307\277\200\34~\322\262s\337"..., 8192, 0, NULL, NULL) = 196
[pid 598] sendto(11, "\30\317\332\271\354+\345:\3231\223\330\303\333x\177\347%\332[\316\241\235\307\277\200\34~\322\262s\337"..., 196, MSG_NOSIGNAL, NULL, 0) = 196
[pid 598] recvfrom(12, 0x7f8ea4002c30, 8192, 0, NULL, NULL) = -1 EAGAIN (Resource temporarily unavailable)
[pid 598] epoll_wait(3, [{EPOLLIN|EPOLLOUT, {u32=16777219, u64=16777219}}], 1024, 334) = 1
[pid 598] recvfrom(12, "\306\214e\204\242x,\315\34\3427\7\241{I\23f\251\321\235\36\262\35#V\372\246\344\277S\4\337"..., 8192, 0, NULL, NULL) = 212
[pid 598] sendto(11, "\306\214e\204\242x,\315\34\3427\7\241{I\23f\251\321\235\36\262\35#V\372\246\344\277S\4\337"..., 212, MSG_NOSIGNAL, NULL, 0) = 212
[pid 598] recvfrom(12, 0x7f8ea4002c30, 8192, 0, NULL, NULL) = -1 EAGAIN (Resource temporarily unavailable)
[pid 598] epoll_wait(3, [{EPOLLIN|EPOLLOUT, {u32=16777219, u64=16777219}}], 1024, 333) = 1
[pid 598] recvfrom(12, "K\223\332\24h\346#N\37\234t\364-\326\v\221p\320\254\363m<\323\254\206\32\250'\362\346\207\246"..., 8192, 0, NULL, NULL) = 180
[pid 598] sendto(11, "K\223\332\24h\346#N\37\234t\364-\326\v\221p\320\254\363m<\323\254\206\32\250'\362\346\207\246"..., 180, MSG_NOSIGNAL, NULL, 0) = 180
[pid 598] recvfrom(12, 0x7f8ea4002c30, 8192, 0, NULL, NULL) = -1 EAGAIN (Resource temporarily unavailable)
[pid 598] epoll_wait(3, [{EPOLLIN|EPOLLOUT, {u32=16777219, u64=16777219}}], 1024, 332) = 1
[pid 598] recvfrom(12, "L\361W\16\244\r\254\244\313\360\357\6n\v\26.\362\364\2068\24\262\23\345\22\263\365z]\37\5~"..., 8192, 0, NULL, NULL) = 164
[pid 598] sendto(11, "L\361W\16\244\r\254\244\313\360\357\6n\v\26.\362\364\2068\24\262\23\345\22\263\365z]\37\5~"..., 164, MSG_NOSIGNAL, NULL, 0) = 164
[pid 598] recvfrom(12, 0x7f8ea4002c30, 8192, 0, NULL, NULL) = -1 EAGAIN (Resource temporarily unavailable)
[pid 598] epoll_wait(3, [{EPOLLIN|EPOLLOUT, {u32=16777219, u64=16777219}}], 1024, 330) = 1
[pid 598] recvfrom(12, "\362\275LJk\200\25*\367\22\370\345\214A\317nX\32L\217;\270gX{\254fZ\206sqL"..., 8192, 0, NULL, NULL) = 140
[pid 598] sendto(11, "\362\275LJk\200\25*\367\22\370\345\214A\317nX\32L\217;\270gX{\254fZ\206sqL"..., 140, MSG_NOSIGNAL, NULL, 0) = 140
[pid 598] recvfrom(12, 0x7f8ea4002c30, 8192, 0, NULL, NULL) = -1 EAGAIN (Resource temporarily unavailable)

我在这里只显示 30 行,但它滚动得非常快。

我的意思是,是的。copy_bidirectional正在从套接字读取数据并复制到另一个套接字。并且还从另一个套接字读取并将其复制到第一个套接字。你期待什么?

没什么,没什么,这是一种非常合理的 I/O 方式:我们有用户空间缓冲区,内核可以将数据复制到其中,也可以从中复制出来。

只是……我们现在有更现代的等价物。

例如?

好吧,我不知道这是否可行,但让我们试一试。

一个很棒的带有 tokio-uring 的 TCP 代理

好吧,我希望一切顺利,因为我没有太多时间来写这篇文章了。

io-uring 是一种不同的 I/O 方式。我会解释我对它的理解,让互联网纠正我。

所以旧的方法就是阻塞系统调用。首先你分配一个缓冲区,然后你做一个系统调用(可能通过一些 libc 包装器,比如reador write),传递你分配的缓冲区的地址(和大小),当它返回时,如果没有错误,你有缓冲区中的一些数据!

您可以通过拥有更多线程来扩大规模!由于每个线程都阻塞在……有更多数据可以从某个地方读取,或者写完成(它可能最终在内核缓冲区中,但这很好)。

然后是非阻塞 I/O,这几乎是一样的,只是你将所有内容(文件描述符、套接字)设置为“非阻塞模式”,并且当你调用“读”和“写”时,如果它们不这样做没有立即可用的数据,如果调用“会阻塞”,它们将返回“EWOULDBLOCK”。

但是你怎么知道什么时候调用 read & write 呢?在一个循环中?

在一个循环中是的,但首先你注册你对一些资源“准备好”的兴趣,然后你做的唯一阻塞系统调用(从你的异步运行时)是等待下一个准备事件。(并且可能有多个事件,因为多个资源可能“同时”准备就绪)。

所以从一个线程你做这样的事情:

  • 打开a,设置为非阻塞,注册兴趣

  • 打开b,设置为非阻塞,注册兴趣

  • 等待下一次就绪事件

  • 我们有准备活动!

  • 其中之一是“a 已准备好读取”

  • 尝试从 a 读取,它要么立即成功,要么返回 EWOULDBLOCK(如果我没记错的话,会发生虚假唤醒吗?)

  • 等待下一次就绪事件

    好的,这就是普通的 tokio 所做的吗

确切地。然后是 io-uring,其中你不执行“每个 I/O 操作一个系统调用”,而是将项目提交到环形缓冲区,你可以从另一个环形缓冲区监视完成,至少我是这样认为的,我’我对细节仍然有点模糊。

啊,所以,总体上更少的系统调用!这听起来很适合……高度并发的东西?

是的,我们的事情不是……我们只是在两个套接字之间进行双向复制。所以它可能甚至没有太大的改进,但是嘿,我以前从未尝试过,我们所需要的只是一个 5.11+ 内核,而且每个人总是说要尝试新东西。这是我在尝试。

所以我们只想添加tokio-uring:

1
2
3
4
5
6
7
8
9
10
# in `hello-axum/Cargo.toml`

[package]
name = "hello-axum"
version = "0.1.0"
edition = "2021"

[dependencies]
tokio = { version = "1.19.2", features = ["full"] }
tokio-uring = "0.3.0"
1
2
3
4
5
6
7
8
9
10
11
12
13
14
15
16
17
18
19
20
21
22
23
24
25
26
27
28
29
30
31
32
33
34
35
36
37
38
39
40
41
42
43
44
45
46
47
48
49
50
51
52
53
54
55
56
57
58
59
60
61
62
63
64
65
66
67
68
69
70
71
72
73
74
75
76
77
78
79
80
81
82
83
84
85
86
87
88
89
90
91
92
93
94
95
96
97
98
99
100
101
102
103
104
105
106
107
108
109
110
111
112
113
114
115
116
117
118
119
120
121
122
123
124
125
126
127
128
129
130
131
132
133
134
135
136
137
use std::{
process::Stdio,
rc::Rc,
sync::atomic::{AtomicU64, Ordering},
time::{Duration, Instant},
};

// we can still use regular tokio stuff!
use tokio::{process::Command, time::sleep};

// but we want the uring versions of TCP sockets.
use tokio_uring::{
buf::IoBuf,
net::{TcpListener, TcpStream},
};

// can't use a regular main function because we need to start a
// `tokio-uring` runtime, which manages both the main tokio runtime
// and the uring runtime.
fn main() {
// nobody's stopping us from defining our own main function though.
tokio_uring::start(main_inner());
}

async fn main_inner() {
// this is regular tokio stuff, still works fine.
let status = Command::new("service")
.arg("ssh")
.arg("start")
.stdin(Stdio::null())
.stdout(Stdio::inherit())
.stderr(Stdio::inherit())
.status()
.await
.unwrap();
assert!(status.success());

let num_conns: Rc<AtomicU64> = Default::default();

// We can still spawn stuff, but with tokio_uring's `spawn`. The future
// we send doesn't have to be `Send`, since it's all single-threaded.
tokio_uring::spawn({
let num_conns = num_conns.clone();
let mut last_activity = Instant::now();

async move {
loop {
if num_conns.load(Ordering::SeqCst) > 0 {
last_activity = Instant::now();
} else {
let idle_time = last_activity.elapsed();
println!("Idle for {idle_time:?}");
if idle_time > Duration::from_secs(60) {
println!("Stopping machine. Goodbye!");
std::process::exit(0)
}
}
sleep(Duration::from_secs(5)).await;
}
}
});

// tokio-uring's TcpListener wants a `SocketAddr`, not a `ToAddrs` or
// something, so let's parse it ahead of time.
let addr = "[::]:2222".parse().unwrap();

// also it doesn't return a future?
let listener = TcpListener::bind(addr).unwrap();
while let Ok((ingress, _)) = listener.accept().await {
println!("Accepted connection");

let num_conns = num_conns.clone();
tokio_uring::spawn(async move {
// same deal, we need to parse first. if you're puzzled why there's
// no mention of `SocketAddr` anywhere, it's inferred from what
// `TcpStream::connect` wants.
let egress_addr = "127.0.0.2:22".parse().unwrap();
let egress = TcpStream::connect(egress_addr).await.unwrap();

num_conns.fetch_add(1, Ordering::SeqCst);

// `read` and `write` take owned buffers (more on that later), and
// there's no "per-socket" buffer, so they actually take `&self`.
// which means we don't need to split them into a read half and a
// write half like we'd normally do with "regular tokio". Instead,
// we can send a reference-counted version of it. also, since a
// tokio-uring runtime is single-threaded, we can use `Rc` instead of
// `Arc`.
let egress = Rc::new(egress);
let ingress = Rc::new(ingress);

// We need to copy in both directions...
let mut from_ingress = tokio_uring::spawn(copy(ingress.clone(), egress.clone()));
let mut from_egress = tokio_uring::spawn(copy(egress.clone(), ingress.clone()));

// Stop as soon as one of them errors
let res = tokio::try_join!(&mut from_ingress, &mut from_egress);
if let Err(e) = res {
println!("Connection error: {}", e);
}
// Make sure the reference count drops to zero and the socket is
// freed by aborting both tasks (which both hold a `Rc<TcpStream>`
// for each direction)
from_ingress.abort();
from_egress.abort();

num_conns.fetch_sub(1, Ordering::SeqCst);
});
}
}

async fn copy(from: Rc<TcpStream>, to: Rc<TcpStream>) -> Result<(), std::io::Error> {
let mut buf = vec![0u8; 1024];
loop {
// things look weird: we pass ownership of the buffer to `read`, and we get
// it back, _even if there was an error_. There's a whole trait for that,
// which `Vec<u8>` implements!
let (res, buf_read) = from.read(buf).await;
// Propagate errors, see how many bytes we read
let n = res?;
if n == 0 {
// A read of size zero signals EOF (end of file), finish gracefully
return Ok(());
}

// The `slice` method here is implemented in an extension trait: it
// returns an owned slice of our `Vec<u8>`, which we later turn back
// into the full `Vec<u8>`
let (res, buf_write) = to.write(buf_read.slice(..n)).await;
res?;

// Later is now, we want our full buffer back.
// That's why we declared our binding `mut` way back at the start of `copy`,
// even though we moved it into the very first `TcpStream::read` call.
buf = buf_write.into_inner();
}
}

docker build, fly m remove –force, fly m run …. 它有效!

让我们来看看我们现在拥有的系统调用:

1
2
3
4
5
6
7
8
9
10
11
12
13
14
15
16
17
18
19
20
21
22
23
24
25
26
27
28
29
30
31
59185369a43383% sudo strace -ff -p $(pidof hello-axum) 2>&1 | head -30
strace: Process 584 attached with 3 threads
[pid 584] epoll_wait(3, 0x56361d15d240, 1024, 951) = -1 EINTR (Interrupted system call)
[pid 584] epoll_wait(3, [{EPOLLIN|EPOLLOUT, {u32=1, u64=1}}], 1024, 947) = 1
[pid 584] write(4, "\1\0\0\0\0\0\0\0", 8) = 8
[pid 584] io_uring_enter(9, 1, 0, 0, NULL, 128) = 1
[pid 584] epoll_wait(3, [{EPOLLIN, {u32=2147483648, u64=2147483648}}, {EPOLLIN|EPOLLOUT, {u32=1, u64=1}}], 1024, 946) = 2
[pid 584] write(4, "\1\0\0\0\0\0\0\0", 8) = 8
[pid 584] io_uring_enter(9, 1, 0, 0, NULL, 128) = 1
[pid 584] epoll_wait(3, [{EPOLLIN, {u32=2147483648, u64=2147483648}}], 1024, 946) = 1
[pid 584] epoll_wait(3, 0x56361d15d240, 1024, 946) = -1 EINTR (Interrupted system call)
[pid 584] epoll_wait(3, [{EPOLLIN|EPOLLOUT, {u32=1, u64=1}}], 1024, 945) = 1
[pid 584] write(4, "\1\0\0\0\0\0\0\0", 8) = 8
[pid 584] io_uring_enter(9, 1, 0, 0, NULL, 128) = 1
[pid 584] epoll_wait(3, [{EPOLLIN, {u32=2147483648, u64=2147483648}}, {EPOLLIN|EPOLLOUT, {u32=1, u64=1}}], 1024, 945) = 2
[pid 584] write(4, "\1\0\0\0\0\0\0\0", 8) = 8
[pid 584] io_uring_enter(9, 1, 0, 0, NULL, 128) = 1
[pid 584] epoll_wait(3, [{EPOLLIN, {u32=2147483648, u64=2147483648}}], 1024, 943) = 1
[pid 584] epoll_wait(3, 0x56361d15d240, 1024, 943) = -1 EINTR (Interrupted system call)
[pid 584] epoll_wait(3, [{EPOLLIN|EPOLLOUT, {u32=1, u64=1}}], 1024, 943) = 1
[pid 584] write(4, "\1\0\0\0\0\0\0\0", 8) = 8
[pid 584] io_uring_enter(9, 1, 0, 0, NULL, 128) = 1
[pid 584] epoll_wait(3, [{EPOLLIN, {u32=2147483648, u64=2147483648}}, {EPOLLIN|EPOLLOUT, {u32=1, u64=1}}], 1024, 943) = 2
[pid 584] write(4, "\1\0\0\0\0\0\0\0", 8) = 8
[pid 584] io_uring_enter(9, 1, 0, 0, NULL, 128) = 1
[pid 584] epoll_wait(3, [{EPOLLIN, {u32=2147483648, u64=2147483648}}], 1024, 943) = 1
[pid 584] epoll_wait(3, 0x56361d15d240, 1024, 943) = -1 EINTR (Interrupted system call)
[pid 584] epoll_wait(3, [{EPOLLIN|EPOLLOUT, {u32=1, u64=1}}], 1024, 942) = 1
[pid 584] write(4, "\1\0\0\0\0\0\0\0", 8) = 8
[pid 584] io_uring_enter(9, 1, 0, 0, NULL, 128) = 1
[pid 584] epoll_wait(3, [{EPOLLIN, {u32=2147483648, u64=2147483648}}, {EPOLLIN|EPOLLOUT, {u32=1, u64=1}}], 1024, 941) = 2

好吧,我io_uring_enter在里面看到了,所以iouring肯定生效了,但它仍然在快速滚动。

阿莫斯?

酷熊

你认为 strace 的输出被发送到哪里?

好吧,到我的终端。我正看着它。
哦。啊啊啊啊啊啊对了。随着 strace 输出更多的数据,它通过 SSH 发送回给我,这导致更多的系统调用,这导致更多的 strace 输出,这导致更多的数据通过 SSH 发送回给我,这……

好吧,如果我们真的想在不中断 hello-axum 操作的情况下窥探(猜猜现在谁后悔选择那个名字了!),我们可能想通过 hallpass 连接:

1
2
3
4
5
6
7
8
9
10
11
12
13
14
15
16
17
18
fly ssh console
Connecting to top1.nearest.of.axum-machine.internal... complete
# bash
root@59185369a43383:/# strace -p $(pidof hello-axum) -ff
strace: Process 584 attached with 3 threads
[pid 584] epoll_wait(3, [], 1024, 565) = 0
[pid 584] epoll_wait(3, [], 1024, 21) = 0
[pid 584] write(4, "\1\0\0\0\0\0\0\0", 8) = 8
[pid 584] write(4, "\1\0\0\0\0\0\0\0", 8) = 8
[pid 584] epoll_wait(3, [{EPOLLIN, {u32=2147483648, u64=2147483648}}], 1024, 2536) = 1
[pid 584] epoll_wait(3, [], 1024, 2536) = 0
[pid 584] epoll_wait(3, [], 1024, 2430) = 0
[pid 584] epoll_wait(3, [], 1024, 30) = 0
[pid 584] write(4, "\1\0\0\0\0\0\0\0", 8) = 8
[pid 584] write(4, "\1\0\0\0\0\0\0\0", 8) = 8
[pid 584] epoll_wait(3, [{EPOLLIN, {u32=2147483648, u64=2147483648}}], 1024, 1631) = 1
[pid 584] epoll_wait(3, [], 1024, 1631) = 0
[pid 584] epoll_wait(3,

更好的!现在我们只看到 SSH keepalives(通过ClientAliveInterval那里设置,你的浏览器有搜索功能我相信你),以及 vscode 和 vscode 服务器之间交换的任何聊天信息。

好的,现在我们的工作完成了。对吗?

Mhhhhhhhh 可以这样说,是的。但我们仍在进行一些系统调用。你知道什么比某些系统调用更好吗?

没有系统调用?

一个带有 aya 的 eBPF 东西

酷熊你看,我们实际上从来没有对我们来回代理的数据做任何有用的事情。这不像我们在做 HTTP,或者如果我们自己是SSH 服务器。

我们只是充当管道,在两个方向上来回复制内容。

起初我考虑过使用像 的系统调用splice,但我意识到,这甚至比 io-uring 更进一步。splice就我而言,io-uring 解决方案更通用,可以完全替代。

我们真正需要做的就是知道是否有数据包发送到/来自 OpenSSH 的端口。如果有:我们有活动,我们熬夜吧!如果没有,我们去睡觉吧。

您知道什么是窥探网络流量的好方法吗?

是不是。。在标题里?是 BPF 吗?

是的!或者 eBPF,如果你想吹毛求疵,但请放心,我短期内没有学习 经典 BPF 的计划。

所以!让我们开始吧。我们实际上需要两个程序:

  • 一个 BPF 程序,我们将为 BPF 目标编译和链接(它最终将成为 ELF 文件中的字节码)
  • 一个常规的 Linux 可执行文件,负责加载我们的 BPF 程序并将其附加到网络接口。
    那么让我们创建一个新项目:
    1
    2
    3
    4
    $ cd hello-axum/
    $ cargo new flyremote-bpf
    Created binary (application) `flyremote-bpf` package

添加几个依赖项:

1
2
3
4
5
6
7
8
9
10
11
12
13
14
15
16
# in `hello-axum/flyremote-bpf/Cargo.toml`

[package]
name = "flyremote-bpf"
version = "0.1.0"
edition = "2021"

# these are important too!
[profile.release]
lto = true
panic = "abort"
codegen-units = 1

[dependencies]
aya-bpf = { git = "https://github.com/aya-rs/aya", branch = "main" }
aya-log-ebpf = { git = "https://github.com/aya-rs/aya-log", branch = "main" }

确保我们为此使用 nightly Rust:

1
2
3
4
# in `hello-axum/flyremote-bpf/rust-toolchain.toml`

[toolchain]
channel="nightly"

有许多不同的 BPF 程序类型。我们可以查看 通过接口的每个数据包(并弄乱它们),但在这里我们真的只需要监听一些事件:什么时候刚刚建立连接?什么时候关闭的?当然,在什么地址/端口上。

这是一个很好的起点:

1
2
3
4
5
6
7
8
9
10
11
12
13
14
15
16
17
18
19
20
21
22
23
24
25
26
27
28
29
30
31
32
33
34
35
36
37
38
39
40
41
42
43
44
45
46
47
48
49
50
51
52
53
54
55
56
57
58
59
60
61
62
63
64
65
66
67
68
69
70
71
72
73
74
75
76
77
78
79
80
81
82
83
84
85
86
87
88
89
90
91
92
93
94
95
96
97
98
99
100
101
102
103
104
105
106
107
108
// in `hello-axum/flyremote-bpf/src/main.rs`

// We won't have an allocator, so we can't bring the Rust standard library
// with us here. Besides, it probably wouldn't pass the BPF verifier.
#![no_std]
#![no_main]
use aya_bpf::{macros::sock_ops, programs::SockOpsContext};
// This works a little like `tracing`!
use aya_log_ebpf::info;

// The proc macro here does the heavy lifting. There's a bunch of linker fuckery
// at hand here that would be fascinating, but that I won't get into.
#[sock_ops(name = "flyremote")]
pub fn flyremote(ctx: SockOpsContext) -> u32 {
match unsafe { try_flyremote(ctx) } {
Ok(ret) => ret,
Err(ret) => ret,
}
}

// This gets called for every "socket operation" event.
unsafe fn try_flyremote(ctx: SockOpsContext) -> Result<u32, u32> {
// transmuting from a `u32` to a `[u8; 4]` - should be okay.
let local_ip4: [u8; 4] = core::mem::transmute([ctx.local_ip4()]);
let remote_ip4: [u8; 4] = core::mem::transmute([ctx.remote_ip4()]);

// log some stuff
info!(
&ctx,
"op ({} {}), local port {}, remote port {}, local ip4 = {}.{}.{}.{} remote ip4 = {}.{}.{}.{}",
op_name(ctx.op()),
ctx.op(),
ctx.local_port(),
// this value is big-endian (but local_port is native-endian)
u32::from_be(ctx.remote_port()),
local_ip4[0],
local_ip4[1],
local_ip4[2],
local_ip4[3],
remote_ip4[0],
remote_ip4[1],
remote_ip4[2],
remote_ip4[3],
);

// that's `BPF_SOCK_OPS_STATE_CB_FLAG` - so we receive "state_cb" events,
// when a socket changes state.
// this may fail, so it returns a `Result`, but I wouldn't know what to do
// if it failed anyway.
let _ = ctx.set_cb_flags(1 << 2);

// if this is a "state_cb" event, show the old state and new state, which
// are the first two arguments (we have up to 4 arguments)
if ctx.op() == 10 {
info!(
&ctx,
"state transition: {} {} => {} {}",
ctx.arg(0),
state_name(ctx.arg(0)),
ctx.arg(1),
state_name(ctx.arg(1)),
);
}

Ok(0)
}

// gleaned from `bpf.h`
fn op_name(op: u32) -> &'static str {
match op {
0 => "void",
1 => "timeout_init",
2 => "rwnd_init",
3 => "tcp_connect_cb",
4 => "active_established_cb",
5 => "passive_established_cb",
6 => "needs_ecn",
7 => "base_rtt",
8 => "rto_cb",
9 => "retrans_cb",
10 => "state_cb",
_ => "unknown",
}
}

// gleaned from `bpf.h` too
fn state_name(op: u32) -> &'static str {
match op {
1 => "established",
2 => "syn-sent",
3 => "syn-recv",
4 => "fin-wait1",
5 => "fin-wait2",
6 => "time-wait",
7 => "close",
8 => "close-wait",
9 => "last-ack",
10 => "listen",
11 => "closing",
12 => "new-syn-recv",
_ => "unknown",
}
}

#[panic_handler]
fn panic(_info: &core::panic::PanicInfo) -> ! {
unsafe { core::hint::unreachable_unchecked() }
}

我们现在可以使用 Rust nightly 为 BPF 目标构建它,行release构建,并要求 rustc 从头开始​​构建 libcore(libstd 的 smol 部分),因为据我所知没有预构建target:

1
2
3
4
5
6
7
8
9
10
11
$ cd hello-axum/flyremote-bpf/
$ cargo +nightly build --verbose --target bpfel-unknown-none -Z build-std=core --release
Fresh unicode-ident v1.0.1
Fresh core v0.0.0 (/home/amos/.rustup/toolchains/nightly-x86_64-unknown-linux-gnu/lib/rustlib/src/rust/library/core)
Fresh rustc-std-workspace-core v1.99.0 (/home/amos/.rustup/toolchains/nightly-x86_64-unknown-linux-gnu/lib/rustlib/src/rust/library/rustc-std-workspace-core)
Fresh proc-macro2 v1.0.39
(cut)
Fresh aya-log-ebpf v0.1.0 (https://github.com/aya-rs/aya-log?branch=main#1b0d3da1)
Compiling flyremote-bpf v0.1.0 (/home/amos/bearcove/flyremote-bpf)
Running `rustc --crate-name flyremote_bpf --edition=2021 src/main.rs (cut.)`
Finished release [optimized] target(s) in 0.88s

我们可以检查结果llvm-objdump:

1
2
3
4
5
6
7
8
9
10
11
12
13
$ llvm-objdump -t target/bpfel-unknown-none/release/flyremote-bpf

target/bpfel-unknown-none/release/flyremote-bpf: file format elf64-bpf

SYMBOL TABLE:
0000000000000000 l df *ABS* 0000000000000000 flyremote_bpf-8df4772bd494bad9
0000000000001890 l sockops/flyremote 0000000000000000 LBB0_30
(cut)
0000000000000000 g F sockops/flyremote 0000000000002a48 flyremote
0000000000000000 g O maps 000000000000001c AYA_LOG_BUF
0000000000000040 g F .text 0000000000000058 .hidden memcpy
000000000000001c g O maps 000000000000001c AYA_LOGS
0000000000000000 g F .text 0000000000000040 .hidden memset

要将其加载到内核中,我们需要一个常规的 Linux 可执行文件。对我们来说它将是hello-axum(现在真的很后悔这个名字,它不再是 axum 驱动的了)。

我们需要这些依赖项:

1
2
3
4
5
6
7
8
9
10
11
12
13
14
15
# in `hello-axum/Cargo.toml`

[package]
name = "hello-axum"
version = "0.1.0"
edition = "2021"

[dependencies]
aya = { version = ">=0.11", features=["async_tokio"] }
aya-log = "0.1"
clap = { version = "3.1", features = ["derive"] }
color-eyre = "0.6.1"
log = "0.4"
simplelog = "0.12"
tokio = { version = "1.19.2", features = ["full"] }

然后:我们将字节码作为可执行文件的一部分,执行一些系统调用来加载它,获取其中程序的句柄,将其附加到默认 cgroup(/sys/fs/cgroup/unified),也要配置些日志。

1
2
3
4
5
6
7
8
9
10
11
12
13
14
15
16
17
18
19
20
21
22
23
24
25
26
27
28
29
30
31
32
33
34
35
36
37
38
39
40
41
42
43
44
45
46
47
// in `hello-axum/src/main.rs`

use aya::programs::SockOps;
use aya::{include_bytes_aligned, Bpf};
use aya_log::BpfLogger;
use clap::Parser;
use log::info;
use simplelog::{ColorChoice, ConfigBuilder, LevelFilter, TermLogger, TerminalMode};
use tokio::signal;

#[derive(Debug, Parser)]
struct Opt {
#[clap(short, long, default_value = "/sys/fs/cgroup/unified")]
cgroup_path: String,
}

#[tokio::main]
async fn main() -> color_eyre::Result<()> {
color_eyre::install()?;

let opt = Opt::parse();

TermLogger::init(
LevelFilter::Debug,
ConfigBuilder::new()
.set_target_level(LevelFilter::Error)
.set_location_level(LevelFilter::Error)
.build(),
TerminalMode::Mixed,
ColorChoice::Auto,
)?;

let mut bpf = Bpf::load(include_bytes_aligned!(
"../flyremote-bpf/target/bpfel-unknown-none/release/flyremote-bpf"
))?;
BpfLogger::init(&mut bpf)?;
let program: &mut SockOps = bpf.program_mut("flyremote").unwrap().try_into()?;
let cgroup = std::fs::File::open(opt.cgroup_path)?;
program.load()?;
program.attach(cgroup)?;

info!("Waiting for Ctrl-C...");
signal::ctrl_c().await?;
info!("Exiting...");

Ok(())
}

在我们再次开始Dockerfile 工作之前,我可以尝试在我的本地机器上运行它:

1
2
3
4
5
6
7
8
9
10
11
12
13
14
15
16
17
$ cargo run
Compiling hello-axum v0.1.0 (/home/amos/bearcove/hello-axum)
Finished dev [unoptimized + debuginfo] target(s) in 3.48s
Running `target/debug/hello-axum`
09:34:56 [DEBUG] (1) aya::bpf: [/home/amos/.cargo/registry/src/github.com-1ecc6299db9ec823/aya-0.11.0/src/bpf.rs:106] [FEAT PROBE] BPF program name support: true
09:34:56 [DEBUG] (1) aya::bpf: [/home/amos/.cargo/registry/src/github.com-1ecc6299db9ec823/aya-0.11.0/src/bpf.rs:109] [FEAT PROBE] BTF support: false
Error:
0: map error
1: the `bpf_map_freeze` syscall failed with code -1
2: Operation not permitted (os error 1)

Location:
src/main.rs:35

Backtrace omitted. Run with RUST_BACKTRACE=1 environment variable to display it.
Run with RUST_BACKTRACE=full to include source snippets.

哦,呃。

似乎你需要成为 root 才能运行它?

好吧……有一个非特权 BPF 这样的东西,只需要调整一些 sysctl 并重新启动,但大多数发行版默认情况下禁用它,因为它具有 复杂的安全隐患。

在我们的 microVM 中,这对我们来说并不重要,因为我们已经以 root 身份运行顶级进程,所以,让我们在这里也以 root 身份运行它:

1
2
3
4
5
6
7
8
9
10
11
12
13
14
15
16
17
18
19
20
$ cargo build --quiet && sudo ./target/debug/hello-axum 
09:37:03 [DEBUG] (1) aya::bpf: [/home/amos/.cargo/registry/src/github.com-1ecc6299db9ec823/aya-0.11.0/src/bpf.rs:106] [FEAT PROBE] BPF program name support: true
09:37:03 [DEBUG] (1) aya::bpf: [/home/amos/.cargo/registry/src/github.com-1ecc6299db9ec823/aya-0.11.0/src/bpf.rs:109] [FEAT PROBE] BTF support: true
09:37:03 [DEBUG] (1) aya::bpf: [/home/amos/.cargo/registry/src/github.com-1ecc6299db9ec823/aya-0.11.0/src/bpf.rs:113] [FEAT PROBE] BTF func support: true
09:37:03 [DEBUG] (1) aya::bpf: [/home/amos/.cargo/registry/src/github.com-1ecc6299db9ec823/aya-0.11.0/src/bpf.rs:116] [FEAT PROBE] BTF global func support: true
09:37:03 [DEBUG] (1) aya::bpf: [/home/amos/.cargo/registry/src/github.com-1ecc6299db9ec823/aya-0.11.0/src/bpf.rs:122] [FEAT PROBE] BTF var and datasec support: true
09:37:03 [DEBUG] (1) aya::bpf: [/home/amos/.cargo/registry/src/github.com-1ecc6299db9ec823/aya-0.11.0/src/bpf.rs:128] [FEAT PROBE] BTF float support: false
09:37:03 [DEBUG] (1) aya::bpf: [/home/amos/.cargo/registry/src/github.com-1ecc6299db9ec823/aya-0.11.0/src/bpf.rs:131] [FEAT PROBE] BTF decl_tag support: false
09:37:03 [DEBUG] (1) aya::bpf: [/home/amos/.cargo/registry/src/github.com-1ecc6299db9ec823/aya-0.11.0/src/bpf.rs:134] [FEAT PROBE] BTF type_tag support: false
09:37:04 [DEBUG] (1) aya::obj::relocation: [/home/amos/.cargo/registry/src/github.com-1ecc6299db9ec823/aya-0.11.0/src/obj/relocation.rs:270] relocating program flyremote function flyremote
09:37:04 [DEBUG] (1) aya::obj::relocation: [/home/amos/.cargo/registry/src/github.com-1ecc6299db9ec823/aya-0.11.0/src/obj/relocation.rs:327] relocating call to callee address 64 (relocation)
09:37:04 [DEBUG] (1) aya::obj::relocation: [/home/amos/.cargo/registry/src/github.com-1ecc6299db9ec823/aya-0.11.0/src/obj/relocation.rs:348] callee is memcpy
09:37:04 [DEBUG] (1) aya::obj::relocation: [/home/amos/.cargo/registry/src/github.com-1ecc6299db9ec823/aya-0.11.0/src/obj/relocation.rs:270] relocating program flyremote function memcpy
09:37:04 [DEBUG] (1) aya::obj::relocation: [/home/amos/.cargo/registry/src/github.com-1ecc6299db9ec823/aya-0.11.0/src/obj/relocation.rs:363] finished relocating program flyremote function memcpy
09:37:04 [DEBUG] (1) aya::obj::relocation: [/home/amos/.cargo/registry/src/github.com-1ecc6299db9ec823/aya-0.11.0/src/obj/relocation.rs:327] relocating call to callee address 64 (relocation)
09:37:04 [DEBUG] (1) aya::obj::relocation: [/home/amos/.cargo/registry/src/github.com-1ecc6299db9ec823/aya-0.11.0/src/obj/relocation.rs:348] callee is memcpy
09:37:04 [DEBUG] (1) aya::obj::relocation: [/home/amos/.cargo/registry/src/github.com-1ecc6299db9ec823/aya-0.11.0/src/obj/relocation.rs:363] finished relocating program flyremote function flyremote
09:37:04 [INFO] hello_axum: [src/main.rs:44] Waiting for Ctrl-C..

该程序等待新的 sockops 事件。我有一个 SSH 服务器在 127.0.0.2 端口 22 上运行,所以如果我尝试从另一个选项卡连接到它:

1
2
$ ssh 127.0.0.2
(omitted: fingerprint stuff, etc.)

…我们看:

1
2
3
4
5
6
7
8
9
10
11
12
13
14
09:38:52 [INFO] flyremote_bpf: [src/main.rs:26] op (tcp_connect_cb 3), local port 59920, remote port 22, local ip4 = 127.0.0.1 remote ip4 = 127.0.0.2
09:38:52 [INFO] flyremote_bpf: [src/main.rs:26] op (rwnd_init 2), local port 59920, remote port 22, local ip4 = 127.0.0.1 remote ip4 = 127.0.0.2
09:38:52 [INFO] flyremote_bpf: [src/main.rs:26] op (timeout_init 1), local port 59920, remote port 22, local ip4 = 127.0.0.1 remote ip4 = 127.0.0.2
09:38:52 [INFO] flyremote_bpf: [src/main.rs:26] op (needs_ecn 6), local port 59920, remote port 22, local ip4 = 127.0.0.1 remote ip4 = 127.0.0.2
09:38:52 [INFO] flyremote_bpf: [src/main.rs:26] op (rwnd_init 2), local port 22, remote port 59920, local ip4 = 127.0.0.2 remote ip4 = 127.0.0.1
09:38:52 [INFO] flyremote_bpf: [src/main.rs:26] op (timeout_init 1), local port 22, remote port 59920, local ip4 = 127.0.0.2 remote ip4 = 127.0.0.1
09:38:52 [INFO] flyremote_bpf: [src/main.rs:26] op (needs_ecn 6), local port 22, remote port 59920, local ip4 = 127.0.0.2 remote ip4 = 127.0.0.1
09:38:52 [INFO] flyremote_bpf: [src/main.rs:26] op (state_cb 10), local port 59920, remote port 22, local ip4 = 127.0.0.1 remote ip4 = 127.0.0.2
09:38:52 [INFO] flyremote_bpf: [src/main.rs:52] state transition: 2 syn-sent => 1 established
09:38:52 [INFO] flyremote_bpf: [src/main.rs:26] op (active_established_cb 4), local port 59920, remote port 22, local ip4 = 127.0.0.1 remote ip4 = 127.0.0.2
09:38:52 [INFO] flyremote_bpf: [src/main.rs:26] op (passive_established_cb 5), local port 22, remote port 59920, local ip4 = 127.0.0.2 remote ip4 = 127.0.0.1
09:38:52 [INFO] flyremote_bpf: [src/main.rs:26] op (state_cb 10), local port 22, remote port 59920, local ip4 = 127.0.0.2 remote ip4 = 127.0.0.1
09:38:52 [INFO] flyremote_bpf: [src/main.rs:52] state transition: 3 syn-recv => 1 established

请注意,我们在这里看到“客户端”和“服务器”套接字都已建立,因为我是从本地主机连接的。

客户端套接字从到127.0.0.1:59920(127.0.0.2:22SSH 服务器所在的位置),而服务器套接字从127.0.0.2:22到 127.0.0.1:59920,恰恰相反。tcp_connect_cb仅用于“传出”连接,最终我们得到一个active_established_cb. 对于另一个方向,我们最终有一个passive_established_cb.

因此,对于我们的实际程序,我们希望passive_established_cb 使用本地端口 22 进行监视。

当我断开连接时,我们得到这个:

1
2
3
4
5
6
7
8
9
10
11
12
13
09:38:56 [INFO] flyremote_bpf: [src/main.rs:26] op (state_cb 10), local port 59920, remote port 22, local ip4 = 127.0.0.1 remote ip4 = 127.0.0.2
09:38:56 [INFO] flyremote_bpf: [src/main.rs:52] state transition: 1 established => 4 fin-wait1
09:38:56 [INFO] flyremote_bpf: [src/main.rs:26] op (state_cb 10), local port 22, remote port 59920, local ip4 = 127.0.0.2 remote ip4 = 127.0.0.1
09:38:56 [INFO] flyremote_bpf: [src/main.rs:52] state transition: 1 established => 8 close-wait
09:38:56 [INFO] flyremote_bpf: [src/main.rs:26] op (state_cb 10), local port 59920, remote port 22, local ip4 = 127.0.0.1 remote ip4 = 127.0.0.2
09:38:56 [INFO] flyremote_bpf: [src/main.rs:52] state transition: 4 fin-wait1 => 5 fin-wait2
09:38:56 [INFO] flyremote_bpf: [src/main.rs:26] op (state_cb 10), local port 59920, remote port 22, local ip4 = 127.0.0.1 remote ip4 = 127.0.0.2
09:38:56 [INFO] flyremote_bpf: [src/main.rs:52] state transition: 5 fin-wait2 => 7 close
09:38:56 [INFO] flyremote_bpf: [src/main.rs:26] op (state_cb 10), local port 22, remote port 59920, local ip4 = 127.0.0.2 remote ip4 = 127.0.0.1
09:38:56 [INFO] flyremote_bpf: [src/main.rs:52] state transition: 8 close-wait => 9 last-ack
09:38:56 [INFO] flyremote_bpf: [src/main.rs:26] op (state_cb 10), local port 22, remote port 59920, local ip4 = 127.0.0.2 remote ip4 = 127.0.0.1
09:38:56 [INFO] flyremote_bpf: [src/main.rs:52] state transition: 9 last-ack => 7 close

关闭 TCP 套接字比它最初看起来要复杂得多!您可以检查 TCP 状态图,如果它没有因为遭受足够长的时间而烙印在您的大脑中。

这是巨大的进步,如果它在我们的 fly.io 机器上运行,我们将最终实现O(0)系统调用。

或者我们会吗?我们不需要……查询一些状态吗?

是的!你认为日志记录目前如何工作?

我不知道,这一切都被魔法过程宏隐藏了。

好吧,我告诉你!当我们llvm-objdump在 BPF 程序上执行时,我们看到了这些行,它们对应于导出的符号:

1
2
0000000000000000 g     O maps   000000000000001c AYA_LOG_BUF
000000000000001c g O maps 000000000000001c AYA_LOGS

在我们的“驱动程序”程序中,我们有这一行:

1
BpfLogger::init(&mut bpf)?;

我敢打赌,如果我们深入研究这个BpfLogger东西到底做了什么,我们就会得到答案:

1
2
3
4
5
6
7
8
9
10
11
12
13
14
15
16
17
18
19
20
21
22
23
24
25
26
27
28
29
30
31
32
33
34
35
36
37
38
39
40
41
42
// in `aya-log/src/lib.rs`


impl BpfLogger {
/// Starts reading log records created with `aya-log-ebpf` and logs them
/// with the default logger. See [log::logger].
pub fn init(bpf: &mut Bpf) -> Result<BpfLogger, Error> {
BpfLogger::init_with_logger(bpf, DefaultLogger {})
}
/// Starts reading log records created with `aya-log-ebpf` and logs them
/// with the given logger.
pub fn init_with_logger<T: Log + 'static>(
bpf: &mut Bpf,
logger: T,
) -> Result<BpfLogger, Error> {
let logger = Arc::new(logger);
let mut logs: AsyncPerfEventArray<_> = bpf.map_mut("AYA_LOGS")?.try_into()?;

for cpu_id in online_cpus().map_err(Error::InvalidOnlineCpu)? {
let mut buf = logs.open(cpu_id, None)?;

let log = logger.clone();
tokio::spawn(async move {
let mut buffers = (0..10)
.map(|_| BytesMut::with_capacity(LOG_BUF_CAPACITY))
.collect::<Vec<_>>();

loop {
let events = buf.read_events(&mut buffers).await.unwrap();

#[allow(clippy::needless_range_loop)]
for i in 0..events.read {
let buf = &mut buffers[i];
log_buf(buf, &*log).unwrap();
}
}
});
}

Ok(BpfLogger {})
}
}

啊啊!就是它!它正在监听“性能事件数组”的变化!我想这是 BPF 程序与用户空间通信的一种方式。

用户空间?

我们的“常规 Linux 可执行文件”指示内核加载我们的 BPF 程序以及将其附加到什么等等。

啊对。

而且我们还了解到 aya-log 消息最多可以是 8K。有趣的。

所以…我想我们可以做同样的事情来在建立新连接(到端口 22)和关闭时发送消息吗?

让我们试试吧!

我们的新程序变成这样:

1
2
3
4
5
6
7
8
9
10
11
12
13
14
15
16
17
18
19
20
21
22
23
24
25
26
27
28
29
30
31
32
33
34
35
36
37
38
39
40
41
42
43
44
45
46
47
48
49
50
51
52
53
54
55
56
57
58
59
60
61
62
63
64
65
66
67
68
69
70
71
72
73
74
75
76
77
78
79
80
81
82
83
84
85
86
// in `hello-axum/flyremote-bpf/src/main.rs`

#![no_std]
#![no_main]
use aya_bpf::{
macros::{map, sock_ops},
maps::PerfEventArray,
programs::SockOpsContext,
};
use aya_log_ebpf::info;

// This is what we'll send over our "perf event array"
#[repr(C)]
pub struct ConnectionEvent {
// 1 = connected, 2 = disconnected
pub action: u32,
}

// We could probably make a Rust enum work here, but I don't feel like fighting
// the verifier too much today.
const ACTION_CONNECTED: u32 = 1;
const ACTION_DISCONNECTED: u32 = 2;

// Just like aya-log does, but this only has events we care about
#[map(name = "EVENTS")]
static mut EVENTS: PerfEventArray<ConnectionEvent> =
PerfEventArray::<ConnectionEvent>::with_max_entries(1024, 0);

#[sock_ops(name = "flyremote")]
pub fn flyremote(ctx: SockOpsContext) -> u32 {
match unsafe { try_flyremote(ctx) } {
Ok(ret) => ret,
Err(ret) => ret,
}
}

unsafe fn try_flyremote(ctx: SockOpsContext) -> Result<u32, u32> {
if ctx.local_port() != 22 {
// don't care if it's not SSH-server-relevant
return Ok(0);
}

// constants gotten from `bpf.h`
const OP_PASSIVE_ESTABLISHED_CB: u32 = 5;
const OP_STATE_CB: u32 = 10;

const STATE_CLOSE: u32 = 7;

match ctx.op() {
OP_PASSIVE_ESTABLISHED_CB => {
info!(&ctx, "Connection accepted!");

// subscribe to `state_cb` events
let _ = ctx.set_cb_flags(1 << 2);

// notify userspace
let ev = ConnectionEvent {
action: ACTION_CONNECTED,
};
EVENTS.output(&ctx, &ev, 0);
}
OP_STATE_CB => {
let new_state = ctx.arg(1);
if new_state == STATE_CLOSE {
info!(&ctx, "Connection closed!");

// notify userspace
let ev = ConnectionEvent {
action: ACTION_DISCONNECTED,
};
EVENTS.output(&ctx, &ev, 0);
}
}
_ => {
// ignore
}
}

Ok(0)
}

#[panic_handler]
fn panic(_info: &core::panic::PanicInfo) -> ! {
unsafe { core::hint::unreachable_unchecked() }
}

多亏了aya-log。

1
2
3
4
5
6
7
$ (cd flyremote-bpf && cargo +nightly build --verbose --target bpfel-unknown-none -Z build-std=core --release)
(cut)
$ cargo build --quiet && sudo ./target/debug/hello-axum
(cut)
10:01:30 [INFO] hello_axum: [src/main.rs:45] Waiting for Ctrl-C...
10:01:36 [INFO] flyremote_bpf: [src/main.rs:49] Connection accepted!
10:01:37 [INFO] flyremote_bpf: [src/main.rs:63] Connection closed!

精彩的!现在,如果我们只订阅我们的 perf 事件数组……

1
2
3
4
5
6
7
8
9
10
11
12
13
14
15
16
17
18
19
20
21
22
23
24
25
26
27
28
29
30
31
32
33
34
35
36
37
38
39
40
41
42
43
44
45
46
47
48
49
50
51
52
53
54
55
56
57
58
59
60
61
62
63
64
65
66
67
68
69
70
71
72
73
74
75
76
77
78
79
80
81
82
83
84
85
86
87
88
89
90
91
92
93
94
95
96
97
98
99
100
101
102
103
104
105
// in `hello-axum/src/main.rs`

use std::{
fs::File,
sync::{
atomic::{AtomicU64, Ordering},
Arc,
},
time::{Duration, Instant},
};

use aya::{include_bytes_aligned, util::online_cpus, Bpf};
use aya::{maps::perf::AsyncPerfEventArray, programs::SockOps};
use aya_log::BpfLogger;
use bytes::BytesMut;
use tokio::{signal, time::sleep};

// This is what we'll receive over our "perf event array". We'd normally
// have a "common" crate we pull from both the bpf-nostd world and the
// userspace-yesstd world, but for this example we're just copying it wholesale.
#[repr(C)]
#[derive(Clone, Copy)]
pub struct ConnectionEvent {
// 1 = connected, 2 = disconnected
pub action: u32,
}

const ACTION_CONNECTED: u32 = 1;
const ACTION_DISCONNECTED: u32 = 2;

// Because we used `repr(C)` we can treat it as POD (plain old data)
unsafe impl aya::Pod for ConnectionEvent {}

#[tokio::main]
async fn main() -> color_eyre::Result<()> {
color_eyre::install()?;

let mut bpf = Bpf::load(include_bytes_aligned!(
"../flyremote-bpf/target/bpfel-unknown-none/release/flyremote-bpf"
))?;
BpfLogger::init(&mut bpf)?;

let num_conns: Arc<AtomicU64> = Default::default();

let mut perf_array = AsyncPerfEventArray::try_from(bpf.map_mut("EVENTS")?)?;
for cpu_id in online_cpus()? {
let mut buf = perf_array.open(cpu_id, None)?;

let num_conns = num_conns.clone();
tokio::spawn(async move {
let mut buffers = (0..10)
.map(|_| BytesMut::with_capacity(1024))
.collect::<Vec<_>>();

loop {
let events = buf.read_events(&mut buffers).await.unwrap();
for buf in &mut buffers[..events.read] {
let ev = unsafe { (buf.as_ptr() as *const ConnectionEvent).read_unaligned() };
match ev.action {
ACTION_CONNECTED => {
println!("Connection accepted!");
num_conns.fetch_add(1, Ordering::SeqCst);
}
ACTION_DISCONNECTED => {
println!("Connection closed!");
num_conns.fetch_sub(1, Ordering::SeqCst);
}
unknown => {
println!("Unknown action: {}", unknown);
}
}
}
}
});
}

tokio::spawn(async move {
let mut last_activity = Instant::now();

loop {
if num_conns.load(Ordering::SeqCst) > 0 {
last_activity = Instant::now();
} else {
let idle_time = last_activity.elapsed();
println!("Idle for {idle_time:?}");
if idle_time > Duration::from_secs(60) {
println!("Stopping machine. Goodbye!");
std::process::exit(0)
}
}
sleep(Duration::from_secs(5)).await;
}
});

let program: &mut SockOps = bpf.program_mut("flyremote").unwrap().try_into()?;
let cgroup = File::open("/sys/fs/cgroup/unified")?;
program.load()?;
program.attach(cgroup)?;

println!("Waiting for Ctrl-C...");
signal::ctrl_c().await?;
println!("Exiting...");

Ok(())
}

它做到了!

1
2
3
4
5
6
7
8
9
10
11
12
13
14
15
16
17
18
19
20
$ cargo build --quiet && sudo ./target/debug/hello-axum
Idle for 19.527µs
Waiting for Ctrl-C...
(in another terminal: ssh 127.0.0.2)
Connection accepted!
(in another terminal: Ctrl-D to close out of SSH)
Connection closed!
Idle for 5.001708865s
Idle for 10.003602174s
Idle for 15.004068679s
Idle for 20.005524839s
Idle for 25.006052848s
Idle for 30.007529878s
Idle for 35.008838041s
Idle for 40.010259957s
Idle for 45.011105232s
Idle for 50.012581951s
Idle for 55.013017848s
Idle for 60.01454433s
Stopping machine. Goodbye!
很棒。但这到底是怎么“在云端”运行的呢?

嗯,Bear,正如我之前所说,我已经在“云中”完成了所有这些工作。我已经在 fly.io 上的实际远程开发环境中测试了该代码。因为他们提供的内核是支持 BPF 的。这就是我知道它会起作用的方式。

“我们需要做的 (TM)”是在我们执行任何这些操作之前重新启动 SSH 服务器,并让它监听……假设这次是 IPv4 上的端口 2222。

等等,我们为什么要更改端口?

好吧,因为我们需要倾听0.0.0.0这个时间。请记住,fly-proxy 是将“边缘端口 22”暴露给 VM 内部某个端口的代理。它实际上是通过eth0接口连接的:

1
2
3
4
5
6
7
8
9
10
11
12
13
$ ip addr show dev eth0
3: eth0: <BROADCAST,MULTICAST,UP,LOWER_UP> mtu 1420 qdisc pfifo_fast state UP group default qlen 1000
link/ether de:ad:f9:57:5a:f4 brd ff:ff:ff:ff:ff:ff
inet 172.19.0.210/29 brd 172.19.0.215 scope global eth0
valid_lft forever preferred_lft forever
inet 172.19.0.211/29 brd 172.19.0.215 scope global secondary eth0
valid_lft forever preferred_lft forever
inet6 2604:1380:71:1403:0:ae09:fd49:1/127 scope global nodad
valid_lft forever preferred_lft forever
inet6 fdaa:0:6964:a7b:5b66:ae09:fd49:2/112 scope global nodad
valid_lft forever preferred_lft forever
inet6 fe80::dcad:f9ff:fe57:5af4/64 scope link
valid_lft forever preferred_lft forever

…但我们不要依赖它。我们现在确实希望 OpenSSH 监听0.0.0.0 (“所有接口”),并且端口 22 已经被 hallpass 用于给定接口,因此绑定会失败。

因此,让我们改为监听端口 2222(留给读者作为练习),并确保调整我们的 BPF 程序,以便它监视与端口 2222 而不是 22 的连接(也留作练习)。

Dockerfile,我会帮忙。但实际上这就是我们已经完成的,只是在 Docker 中:我们只需要改下“builder”目标的最后一部分。

1
2
3
4
5
6
7
8
9
10
11
12
13
14
15
16
17
18
19
20
21
22
23
24
25
# in `hello-axum/Dockerfile`

# syntax = docker/dockerfile:1.4

################################################################################
FROM ubuntu:20.04 AS builder

# (omitted: install base utils, install rustup, add rustup to path)

# Build some code!
WORKDIR /app
COPY . .
RUN --mount=type=cache,target=/app/target \
--mount=type=cache,target=/root/.cargo/registry \
--mount=type=cache,target=/root/.cargo/git \
--mount=type=cache,target=/root/.rustup \
set -eux; \
rustup install nightly; \
rustup component add rust-src --toolchain nightly; \
cargo +nightly install bpf-linker; \
(cd flyremote-bpf && cargo +nightly build --verbose --target bpfel-unknown-none -Z build-std=core --release); \
cargo +nightly build --release; \
objcopy --compress-debug-sections target/release/hello-axum ./hello-axum

# (omitted: other targets)

这里需要注意一点:无论如何我们都需要nightly构建 BPF 程序,所以我也选择用它来构建主程序,这样我们就不必安装两个不同的工具链。我们需要rust-src组件,所以我们添加它。这绝对是安装位bpf-linker的错误位置(我们之前想这样做 COPY . .),但你可以弄清楚这一点。

到现在为止,您应该知道如何强制移除旧机器并运行新机器,所以我不会展示这部分——相反,我将展示一些日志,这些日志提供了它按预期工作的不可抗拒的证据:

1
2
3
4
5
6
7
8
9
10
11
12
13
14
15
16
17
18
19
20
21
22
23
24
25
26
27
28
29
$ fly logs
(cut)
2022-06-20T10:32:59Z app[73d8d463ce7589] cdg [info]Idle for 55.013385687s
2022-06-20T10:33:04Z app[73d8d463ce7589] cdg [info]Idle for 60.014628076s
2022-06-20T10:33:04Z app[73d8d463ce7589] cdg [info]Stopping machine. Goodbye!
2022-06-20T10:35:09Z proxy[73d8d463ce7589] cdg [info]Machine started in 378.712588ms
2022-06-20T10:35:09Z app[73d8d463ce7589] cdg [info] * Starting OpenBSD Secure Shell server sshd
2022-06-20T10:35:09Z app[73d8d463ce7589] cdg [info] ...done.
2022-06-20T10:35:09Z app[73d8d463ce7589] cdg [info]Idle for 351ns
2022-06-20T10:35:09Z app[73d8d463ce7589] cdg [info]Waiting for Ctrl-C...
2022-06-20T10:35:09Z proxy[73d8d463ce7589] cdg [info]Machine became reachable in 162.022275ms
2022-06-20T10:35:09Z app[73d8d463ce7589] cdg [info]Connection accepted!
2022-06-20T10:35:24Z app[73d8d463ce7589] cdg [info]Connection closed!
2022-06-20T10:35:29Z app[73d8d463ce7589] cdg [info]Idle for 5.000919043s
2022-06-20T10:35:33Z app[73d8d463ce7589] cdg [info]Connection accepted!
2022-06-20T10:35:37Z app[73d8d463ce7589] cdg [info]Connection closed!
2022-06-20T10:35:39Z app[73d8d463ce7589] cdg [info]Idle for 5.001182727s
2022-06-20T10:35:44Z app[73d8d463ce7589] cdg [info]Idle for 10.00136033s
2022-06-20T10:35:49Z app[73d8d463ce7589] cdg [info]Idle for 15.002518752s
2022-06-20T10:35:54Z app[73d8d463ce7589] cdg [info]Idle for 20.003763466s
2022-06-20T10:35:59Z app[73d8d463ce7589] cdg [info]Idle for 25.00504594s
2022-06-20T10:36:04Z app[73d8d463ce7589] cdg [info]Idle for 30.006257662s
2022-06-20T10:36:09Z app[73d8d463ce7589] cdg [info]Idle for 35.007527924s
2022-06-20T10:36:14Z app[73d8d463ce7589] cdg [info]Idle for 40.008764092s
2022-06-20T10:36:19Z app[73d8d463ce7589] cdg [info]Idle for 45.010007093s
2022-06-20T10:36:24Z app[73d8d463ce7589] cdg [info]Idle for 50.011195821s
2022-06-20T10:36:29Z app[73d8d463ce7589] cdg [info]Idle for 55.011391438s
2022-06-20T10:36:34Z app[73d8d463ce7589] cdg [info]Idle for 60.01265106s
2022-06-20T10:36:34Z app[73d8d463ce7589] cdg [info]Stopping machine. Goodbye!

啊……幸福。

你是不是忘记了什么?

啊对!我们实际执行了多少系统调用?既然它是这个悲惨世界中善良的唯一衡量标准?

为了测试这一点,我将从 VSCode 进行连接,并运行一些不断输出文本的东西,比如……好吧,也许不是yes,但是watch whoami。

然后从fly ssh console,我们就跑strace…

1
2
3
4
5
6
7
8
9
10
11
12
13
14
15
16
17
18
19
20
21
22
$ strace -ff -p $(pidof hello-axum)
strace: Process 583 attached with 9 threads
[pid 596] futex(0x7fb0baa0d618, FUTEX_WAIT_PRIVATE, 1, NULL <unfinished ...>
[pid 595] futex(0x7fb0bac11618, FUTEX_WAIT_PRIVATE, 1, NULL <unfinished ...>
[pid 594] epoll_wait(3, <unfinished ...>
[pid 592] futex(0x7fb0bb21d618, FUTEX_WAIT_PRIVATE, 1, NULL <unfinished ...>
[pid 591] futex(0x7fb0bb41e618, FUTEX_WAIT_PRIVATE, 1, NULL <unfinished ...>
[pid 590] futex(0x7fb0bb622618, FUTEX_WAIT_PRIVATE, 1, NULL <unfinished ...>
[pid 589] futex(0x7fb0bb823618, FUTEX_WAIT_PRIVATE, 1, NULL <unfinished ...>
[pid 583] futex(0x7fb0bb825498, FUTEX_WAIT_PRIVATE, 1, NULL <unfinished ...>
[pid 593] futex(0x7fb0bb019618, FUTEX_WAIT_PRIVATE, 1, NULL <unfinished ...>
[pid 594] <... epoll_wait resumed>[], 1024, 1718) = 0
[pid 594] epoll_wait(3, [], 1024, 30) = 0
[pid 594] write(4, "\1\0\0\0\0\0\0\0", 8) = 8
[pid 594] epoll_wait(3, [{EPOLLIN, {u32=2147483648, u64=2147483648}}], 1024, 1824) = 1
[pid 594] epoll_wait(3, [], 1024, 1824) = 0
[pid 594] epoll_wait(3, [], 1024, 3134) = 0
[pid 594] epoll_wait(3, [], 1024, 37) = 0
[pid 594] write(4, "\1\0\0\0\0\0\0\0", 8) = 8
[pid 594] epoll_wait(3, [{EPOLLIN, {u32=2147483648, u64=2147483648}}], 1024, 919) = 1
[pid 594] epoll_wait(3, [], 1024, 919) = 0
[pid 594] epoll_wait(3,

嗯。它非常安静。让我们尝试断开连接?

1
2
3
4
5
6
7
8
9
10
11
12
13
14
15
16
17
18
19
[], 1024, 2775) = 0
[pid 594] epoll_wait(3,
[{EPOLLIN, {u32=2, u64=2}}, {EPOLLIN, {u32=10, u64=10}}], 1024, 2173) = 2
[pid 594] futex(0x7fb0bb823618, FUTEX_WAKE_PRIVATE, 1) = 1
[pid 589] <... futex resumed>) = 0
[pid 594] write(1, "Connection closed!\n", 19 <unfinished ...>
[pid 589] futex(0x7fb0bb019618, FUTEX_WAKE_PRIVATE, 1 <unfinished ...>
[pid 594] <... write resumed>) = 19
[pid 589] <... futex resumed>) = 1
[pid 593] <... futex resumed>) = 0
[pid 594] futex(0x7fb0bae15618, FUTEX_WAIT_PRIVATE, 1, NULL <unfinished ...>
[pid 593] epoll_wait(3, <unfinished ...>
[pid 589] futex(0x7fb0bb823618, FUTEX_WAIT_PRIVATE, 1, NULL <unfinished ...>
[pid 593] <... epoll_wait resumed>[], 1024, 1370) = 0
[pid 593] epoll_wait(3, [], 1024, 49) = 0
[pid 593] write(1, "Idle for 5.001369468s\n", 22) = 22
[pid 593] write(4, "\1\0\0\0\0\0\0\0", 8) = 8
[pid 593] epoll_wait(3, [{EPOLLIN, {u32=2147483648, u64=2147483648}}], 1024, 1869) = 1
[pid 593] epoll_wait(3,

现在重新连接?

1
2
3
4
5
6
7
8
9
10
11
12
13
14
[], 1024, 1869) = 0
[pid 593] epoll_wait(3, [], 1024, 3070) = 0
[pid 593] epoll_wait(3, [], 1024, 57) = 0
[pid 593] write(1, "Idle for 10.002899968s\n", 23) = 23
[pid 593] write(4, "\1\0\0\0\0\0\0\0", 8) = 8
[pid 593] epoll_wait(3, [{EPOLLIN, {u32=2147483648, u64=2147483648}}], 1024, 964) = 1
[pid 593] epoll_wait(3, [], 1024, 964) = 0
[pid 593] epoll_wait(3, [{EPOLLIN, {u32=2, u64=2}}, {EPOLLIN, {u32=10, u64=10}}], 1024, 4031) = 2
[pid 593] futex(0x7fb0bb823618, FUTEX_WAKE_PRIVATE, 1) = 1
[pid 593] write(1, "Connection accepted!\n", 21) = 21
[pid 589] <... futex resumed>) = 0
[pid 593] epoll_wait(3, <unfinished ...>
[pid 589] futex(0x7fb0bb823618, FUTEX_WAIT_PRIVATE, 1, NULL

太厉害了。
阿摩司?这不是完全矫枉过正吗?
哦,几乎可以肯定。我认为没有人需要那么多地优化他们的远程开发环境:我们绝对可以忍受手动将缓冲区从内核空间复制到用户空间并返回的额外开销。

但是我们能做到不是很酷吗?

确实。但我的意思是...为此使用 BPF?

哦,是的,这也太过分了。再一次,我只是在这一点上屈服(教学,我的意思是教学)。

是的,我想说的是……可能还有其他方法可以知道 OpenSSH 的进程有哪些连接,对吗?内核不跟踪那个吗?

它 100% 绝对可以,因此有一个更简单的解决方案,我们可以使用 bash 脚本来完成。

哦哦,我们在写 bash 脚本吗?

哦不。不不不。今天不行。

简单地轮询 procfs

看,内核很友好,可以简单地通过 procfs 公开各种信息。所以如果你愿意阅读几个文件,你可以得到这个,例如:

1
2
3
4
5
6
7
8
9
10
root@73d8d463ce7589:/# cat "/proc/$(pidof -s sshd)/net/tcp"
sl local_address rem_address st tx_queue rx_queue tr tm->when retrnsmt uid timeout inode
0: 00000000:08AE 00000000:0000 0A 00000000:00000000 00:00000000 00000000 0 0 10244 1 000000007d0c6713 100 0 0 10 0
1: 0100007F:8019 00000000:0000 0A 00000000:00000000 00:00000000 00000000 1000 0 7194 1 000000000b0ca858 100 0 0 10 0
2: 1A0413AC:08AE 47851C93:E44A 01 00000000:00000000 02:000A7F5E 00000000 0 0 13366 2 00000000255b322e 21 4 30 10 50
3: 0100007F:8019 0100007F:E76C 01 00000000:00000000 00:00000000 00000000 1000 0 7682 1 000000004d3b51d2 21 4 2 10 -1
4: 0100007F:8019 0100007F:E76A 01 00000000:00000000 00:00000000 00000000 1000 0 7680 1 00000000eb58348a 20 4 30 10 -1
5: 0100007F:E76C 0100007F:8019 01 00000000:00000000 00:00000000 00000000 1000 0 13405 1 00000000d63dc6ce 21 4 18 10 -1
6: 0100007F:E76A 0100007F:8019 01 00000000:00000000 00:00000000 00000000 1000 0 13403 1 0000000057ff1c3b 20 4 10 10 -1

这是啥?

好吧,它是这么说的!这是一个 TCP 连接列表:有本地地址、远程地址和一些更多信息。

好的,但是那些地址看起来……我的意思是……它们看起来有点像 MAC 地址?

哦不不,它们只是十六进制。因此,例如,我们现在让 sshd 在端口 2222 上侦听,以十六进制表示,是吗?

哦,0x8AE!

正确!因此,这是我们的活跃链接:

1
2
3
4
root@73d8d463ce7589:/# grep "08AE" "/proc/$(pidof -s sshd)/net/tcp"
0: 00000000:08AE 00000000:0000 0A 00000000:00000000 00:00000000 00000000 0 0 10244 1 000000007d0c6713 100 0 0 10 0
2: 1A0413AC:08AE 47851C93:E44A 01 00000000:00000000 02:000A50A1 00000000 0 0 13366 2 00000000255b322e 21 4 30 10 50

等等,不,有两个。

啊,也许第一个是监听套接字?

大概!这似乎是正确的,因为它对一堆字段具有全零值。

事实上,让我们尝试断开连接…

1
2
root@73d8d463ce7589:/# grep "08AE" "/proc/$(pidof -s sshd)/net/tcp"
0: 00000000:08AE 00000000:0000 0A 00000000:00000000 00:00000000 00000000 0 0 10244 1 000000007d0c6713 100 0 0 10 0

是的!听起来不错。

好的,我现在明白你对 bash 脚本的意思了。因为它只是一个文件,我们可以喜欢... grep for 08AE,排除那些00000000东西,然后有一个计数器来跟踪没有连接的时间...然后如果已经有一段时间就退出...

是的,因为 bash 在字符串和数字(​​不要@我)、时间和条件,事实上一切方面都非常糟糕,而且因为有一个整洁的 procfs crate,而且因为这仍然是我的博客,我仍然制作规则在这里,我只是要写 Rust。

让我们开始吧:

1
2
3
4
5
6
7
$ cargo add procfs
Updating 'https://github.com/rust-lang/crates.io-index' index
Adding procfs v0.12.0 to dependencies.
Features:
+ chrono
+ flate2
- backtrace

我们的 Cargo.toml 变成这样,非常精简,不再需要 tokio:

1
2
3
4
5
6
7
8
9
10
# in `hello-axum/Cargo.toml`

[package]
name = "hello-axum"
version = "0.1.0"
edition = "2021"

[dependencies]
color-eyre = "0.6.1"
procfs = "0.12.0"
1
2
3
4
5
6
7
8
9
10
11
12
13
14
15
16
17
18
19
20
21
22
23
24
25
26
27
28
29
30
31
32
33
34
35
36
37
38
39
40
41
42
43
44
45
46
47
48
// in `hello-axum/src/main.rs`

use std::{
process::{Command, Stdio},
thread::sleep,
time::{Duration, Instant},
};

use procfs::net::TcpState;

fn main() -> color_eyre::Result<()> {
color_eyre::install()?;

let status = Command::new("service")
.arg("ssh")
.arg("start")
.stdin(Stdio::null())
.stdout(Stdio::inherit())
.stderr(Stdio::inherit())
.status()?;
assert!(status.success());

let mut last_activity = Instant::now();

loop {
if count_conns()? > 0 {
last_activity = Instant::now();
} else {
let idle_time = last_activity.elapsed();
println!("Idle for {idle_time:?}");
if idle_time > Duration::from_secs(60) {
println!("Stopping machine. Goodbye!");
std::process::exit(0)
}
}
sleep(Duration::from_secs(5));
}
}

fn count_conns() -> color_eyre::Result<usize> {
Ok(procfs::net::tcp()?
.into_iter()
// don't count listen, only established
.filter(|entry| matches!(entry.state, TcpState::Established))
.filter(|entry| matches!(entry.local_address.port(), 2222))
.count())
}

我们的 Dockerfile 的构建部分也很简单:

1
2
3
4
5
6
7
8
9
10
11
# Build some code!
WORKDIR /app
COPY . .
RUN --mount=type=cache,target=/app/target \
--mount=type=cache,target=/root/.cargo/registry \
--mount=type=cache,target=/root/.cargo/git \
--mount=type=cache,target=/root/.rustup \
set -eux; \
rustup install stable; \
cargo build --release; \
objcopy --compress-debug-sections target/release/hello-axum ./hello-axum

和以前一样……它有效:

1
2
3
4
5
6
7
8
9
10
11
12
13
14
15
16
17
18
19
$ fly logs
2022-06-20T11:06:04Z proxy[06e82219b74987] cdg [info]Machine started in 492.723163ms
2022-06-20T11:06:04Z app[06e82219b74987] cdg [info] * Starting OpenBSD Secure Shell server sshd
2022-06-20T11:06:04Z app[06e82219b74987] cdg [info] ...done.
2022-06-20T11:06:04Z app[06e82219b74987] cdg [info]Idle for 125.596µs
2022-06-20T11:06:04Z proxy[06e82219b74987] cdg [info]Machine became reachable in 81.028264ms
2022-06-20T11:06:14Z app[06e82219b74987] cdg [info]Idle for 5.000259697s
2022-06-20T11:06:19Z app[06e82219b74987] cdg [info]Idle for 10.001721387s
2022-06-20T11:06:24Z app[06e82219b74987] cdg [info]Idle for 15.002035967s
2022-06-20T11:06:29Z app[06e82219b74987] cdg [info]Idle for 20.002387236s
2022-06-20T11:06:34Z app[06e82219b74987] cdg [info]Idle for 25.002711273s
2022-06-20T11:06:39Z app[06e82219b74987] cdg [info]Idle for 30.003033687s
2022-06-20T11:06:44Z app[06e82219b74987] cdg [info]Idle for 35.003318902s
2022-06-20T11:06:49Z app[06e82219b74987] cdg [info]Idle for 40.003605699s
2022-06-20T11:06:54Z app[06e82219b74987] cdg [info]Idle for 45.003890203s
2022-06-20T11:06:59Z app[06e82219b74987] cdg [info]Idle for 50.004175949s
2022-06-20T11:07:04Z app[06e82219b74987] cdg [info]Idle for 55.004478496s
2022-06-20T11:07:09Z app[06e82219b74987] cdg [info]Idle for 60.004781203s
2022-06-20T11:07:09Z app[06e82219b74987] cdg [info]Stopping machine. Goodbye!
这很无聊。一切正常。

正确的??然而我对此很兴奋。我很高兴知道,有了 Rust,我可以做以下任何事情:

  • 使用线程阻塞 I/O
  • tokio 的非阻塞 I/O
  • io-uring 与 tokio-uring
  • 带 aya 的 eBPF
  • 只读procfs
    而且它们都非常无聊,工作得很好。我很乐意将它们留在生产环境中,再也不会碰它们。

对我来说,这就是梦想。